

Note that while this project and related videos are specific to use with the DIY amp, they could easily be adapted for other uses. A SiriusXM local streaming server can be used in multiple ways and the touch interface can also be adapted to all sorts of other uses with Home Assistant. If you prefer to just see an overview of the project, you can watch a YouTube video version.
This article picks up where the last one leaves off... basically after the amp, along with an ESP32, has been built and configured. If you have not reviewed those videos and blog articles, it is recommended that you review those first as that content will not be covered again here.
Overview of the Arylic Amp (YouTube video)
Building the Amp Video (YouTube video)
Building the Amp Article (Written guide)
Now, to get the most out of this particular enhancement, it does require that you have a SiriusXM streaming subscription (although there are a handful of free channels). It may be well possible to adapt the project for other streaming services if they provide an API and you can create the code, Docker container or other method of making that stream available to the amp. I won't be covering those here, but if you do find a way to use other streaming services, let me know in the comments and I can update this article accordingly!
Background (Why?)
While the DIY amp has a lot of features and potential sources, one of my personal favorites for streaming music is SiriusXM. The amp did not provide a native way to stream SiriusXM, so to listen to this music required use of either the app on my phone and Bluetooth, or the app in a web browser and streaming via a USB connection to the amp. However, the amp does provide an HTTP API that will stream directly from a URL. SiriusXM doesn't provide URLs directly to the various channels, but there is an API that allows you to create a local streaming server that DOES have a URL that can be used by the amp.
So, part one will cover setting up this local streaming server. Part two will cover the building and configuration of the touch screen controls that allows me to select various SiriusXM stations without using the optional Home Assistant interface.
Acknowledgements and Attributions
A huge thanks to Kevin Dorff (Dorffmeister) who not only developed the design, libraries and code for much of the touch screen, but also provided assistance and support for both the creation of the SiriusXM streaming service and implementation of touch screen.
Additional credit to Christopher Bailey (AngellusMortis) for the SiriusXM API and documentation (forked from the original by 'Andrew0').
SiriusXM and all related materials to this service and channels referenced are © 2023 Sirius XM Radio Inc.
Included Code Samples
Numerous examples of the code used will be included in this article, along with explanations of that code so that you do not need to be a Linux, YAML or C++ expert to adapt this code for your own use. However, please do not try to copy and paste any code directly from this blog article into your project. There may be word wraps or carriage returns inserted in the code here for display purposes and may vary based on the type of device you are using to read this article.
Instead, please use the Github repo if you wish to copy and paste any of the code shown below. The code in the Github repo will be formatted and indented properly for use in your own projects. You can find links to my Github repo, along with Kevin's and his additional examples at the end of this article.
Part 1 - Creation of the SiriusXM local streaming server
The SiriusXM local stream server is a Python application (SXM) that, among other features, allows you to pass a SiriusXM channel ID to the server and it will provide a live stream of that SiriusXM channel. This stream can then be played on any compatible receiver. Some features include:
- A CLI SXM client
- Provides any SXM client via an anonymous HLS stream that can be play on any compatible remote client
- Provides CLI interface to play SXM channel to a MP3 file on disk
- Can archive live streams from a channel and process any songs/shows from it
- Pluggable API to allow you to create your own SXM clients on top of it
Installing as Docker container with Docker-compose
Since I already had multiple Proxmox servers in use, the easiest path for me was to run the SiriusXM app in a Docker container. Again, if you have a different platform (NAS, etc.) that is using Docker, you can adapt the instructions here for your platform. Or as mentioned above, you can simply run it as a Python application on a Raspberry Pi or any platform running Python 3. Full instructions for using as a Python app, including command line instructions and how to use in your own Python application, can be found here: sxm-client 0.2.8 documentation.
I will assume that you know how to create a Proxmox container, perform the basic setup of that Linux container (Alpine in my case) and install Docker. I'll just provide some bullet points here with a couple of particular notes. However, if you are not familiar with these steps, Dorffmeister has provided and outstanding step-by-step video of this entire process, along with scripts used. This is the exact guide I followed, up until the point where he creates a sample docker-compose.yaml file. He creates a sample using an app called Uptime-Kuma. At that point, we'll just substitute the docker-compose.yaml file with the version for the SXM app (shown below). Here is Kevin's video if you wish to use it to create your container: Making a docker-compose stack on an Alpine Container in Proxmox
Here are the highlights:
- Create an Alpine Linux container.
I used Alpine 3.17. The SXM app requires very little in terms of processor or RAM. Unless you plan on running additional Docker containers, then 1 CPU, 1-2 GB RAM and a 4 GB disk is more than enough resources. Again, you may need to add more resources if you want to run other Docker containers alongside SXM.
- Update and configure the Alpine container and install Docker
This will involve all the 'normal' setup step for a new Linux install... updating, creating a new user, etc. Again, if this is somewhat new to you, you can follow Kevin's video linked above. But after you get Docker installed, we will deviate from his video and install SXM instead of his example of Uptime-Kuma
- Create the docker-compose file for SXM
Here is the recommended process for creating the SXM docker-compose file. First create a dedicated folder /docker. Within this folder, create a new file called docker-compose.yml and paste in the following contents:
version: '3.7'
services:
sxm:
image: angellusmortis/sxm-player:latest
restart: unless-stopped
container_name: sxm
environment:
- SXM_USERNAME=your_sirius_user_name
- SXM_PASSWORD=your_sirius_password
ports:
- 9000:9999
services:
sxm:
image: angellusmortis/sxm-player:latest
restart: unless-stopped
container_name: sxm
environment:
- SXM_USERNAME=your_sirius_user_name
- SXM_PASSWORD=your_sirius_password
ports:
- 9000:9999
Obviously, you'll need to substitute your SiriusXM user name and password in the above file. And note that you will only have access to the stations that are valid for your subscription (this process does NOT grant you access that you would not normally have via any other SiriusXM device or the SiriusXM web interface).
Save this file and start the docker-compose stack with the command:
docker compose up -d
If you don't see any errors, congratulations! The service is now up and running. You can also create a script that will update and restart your containers if desired. This is also covered towards the end of Kevin's video above.
Using the Streaming Service
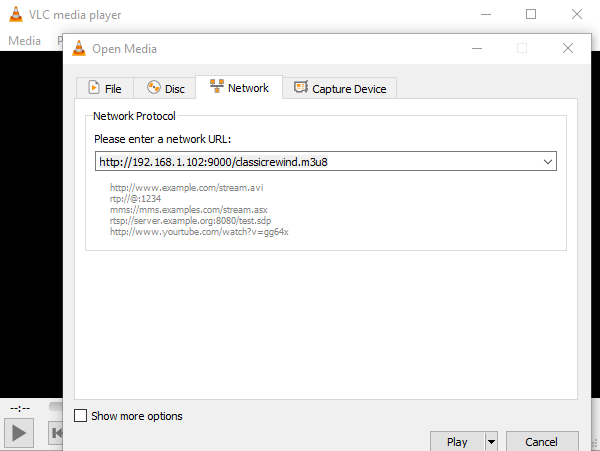
To play a SiriusXM station, you now just need to issue the following command from a device that can accept a network audio stream (VLC media player is a good choice for testing your server):
http://your_server_ip:9000/{channel_id}.m3u8
For example, here is how I can launch the SiriusXM station "Classic Rewind" via VLC to play on my local computer (my server's IP is 192.168.1.102):
 |
| Click to enlarge |
After a few seconds, and if all is working, Classic Rewind will start streaming to your local computer!
An important note on Channel ID vs. Channel Number
The channel ID used for the streaming server is not the same as the SiriusXM channel number that you'd normally use via your car, the web app or other SiriusXM device. Instead the Station ID is an internal number used by the API. How do you get these station ID's? Well for one, the documentation give a list of current channel IDs for most stations, but SiriusXM occasionally moves channels around. You can also get a list of your current subscribed stations by using an SXM command, If you are running in a Docker container, this is the process (if just running as a Python app, you should be able to issue this same command from the CLI):
Open up a terminal/shell window on within the container or VM running your docker stack. Issue the following command:
docker compose exec sxm bash
This will give you a command prompt inside of the running container. Then just issue this command:
sxm -l (lower case L)
The console will then print a list of all the channel IDs, numbers and names for your subscription:

This listing gives you the ID you need to use in the command line, along with the actual SiriusXM channel number and name. For example, to stream The Beatle's Channel, you'd use the channel ID of 9446. To stream 70's on 7, you'd use an ID of 'totally70s'.
The only issue I've found with the above method is that the listing only seems to go up to SiriusXM channel number 999... which means it does not include any of the Xtra channels (despite the fact that they are included in my subscription and I can play those stations via the web app). I've been unable to find a way to extract a channel ID for these stations. If you know of a way to get the channel ID for these Xtra stations, please let me know in the comments!
Interfacing with the DIY amp and Home Assistant
Using VLC works, but isn't really any better than using the SiriusXM app in a web browser. I wanted to be able to play SiriusXM music to my DIY amp and control it via Home Assistant.
First, the amp has the ability to stream directly from a URL using the amp's HTTP API:
http://amp_ip_address/httpapi.asp?command=setPlayerCmd:play:uri
So, I just have to drop in the URI for the SiriusXM service into this command, where the first IP address (.103) is the IP address of my amp and the second IP address (.102) is the IP address of my SXM server:
http://192.168.1.103/httpapi.asp?command=setPlayerCmd:play:http://192.168.1.102:9000/9375.m3u8
(9375 is the channel ID for Classic Rock - just substitute this with any valid channel ID to play that channel).
In fact, you can just enter this command in a browser address bar and the amp should start streaming that channel! But using a browser bar to select and play stations isn't the most convenient. So, let's add methods and a dashboard to Home Assistant for that purpose.
Creating a Home Assistant RESTful command
In Home Assistant, a RESTful command can be created that will call the http command. Now, a RESTful command could be created for each channel for every channel shortcut we wish to implement, but instead, let's create it with a parameter for the channel ID and we can pass that channel ID to the command. Again, I'm using my IP addresses for the amp and SXM server... so, you'd need to substitute yours in the following:
rest_command:
play_sirius_station:
url: 'http://192.168.1.103/httpapi.asp?command=setPlayerCmd:play:http://192.168.1.102:9000/{{station_id }}.m3u8'
(note: the url line should be all on one line.. don't split it as shown above due to wrapping)
Note the use of {{ station_id }} in the URL. This is a parameter that will be used to pass in the channel ID when calling the rest command.
Now, simple scripts can be created for any SiriusXM channel that we wish to launch from Home Assistant:
script:
sirius_classicrewind:
alias: Sirius Classic Rewind
sequence:
- service: rest_command.play_sirius_station
data:
station_id: "classicrewind"
sirius_redwhitebooze:
alias: Sirius Red White Booze
sequence:
- service: rest_command.play_sirius_station
data:
station_id: "9178"
sirius_classicrock:
alias: Sirius Classic Rock
sequence:
- service: rest_command.play_sirius_station
data:
station_id: "9375"
For each of the three examples above, the channel (or station) ID is passed to the rest_command as a parameter under the data: tag. You can continue to create as many of these scripts as you like for your favorite SiriusXM stations. Once the scripts are created, a dashboard can be created to call these scripts.
Creating a Home Assistant Dashboard
 |
| Click to enlarge |
This is my Home Assistant SiriusXM dashboard. There are many different ways to create a dashboard, but the key here is to create controls to call the various scripts that launch the desired channels. I'll provide a few highlights of how I opted to create mine here... and you can find the full YAML for this dashboard in the Github repo that covers all the code related to the amp.
The above dashboard is actually a subview from the main amp dashboard:
 |
| Click to enlarge |
Again, more on building the amp itself and the above dashboard can be found in the other videos and articles listed at the start and end of this article
For each of the channel shortcuts on the SiriusXM subview, I am using the custom button card, available via the Home Assistant Community Store (HACS). If you have not used the custom button card, I have a YouTube video that covers the installation and some basic use cases for this versatile card and you can find it here: Home Assistant Custom Button Card.
For each button, I also create small thumbnail of each channel's logo. These logos were placed in a /www/sirius folder under the Home Assistant main /config folder. Then each button was defined similar to the following:

- type: custom:button-card
aspect_ratio: 2/1.5
name: Cls Rewind
entity_picture: /local/sirius/classicrewind.jpg
show_entity_picture: true
tap_action:
action: call-service
service: script.sirius_classicrewind
For each button, the image is specified via the 'entity_picture' property (note that YAML uses /local/ to refer to the /www folder). Then for the tap action, it just calls the script created for that particular channel.
A few other optional items I added to my dashboard:
I added a 'Now Playing' to indicate when channel is currently streaming. This is just done with a standard input_text entity (helper) and is set by adding an additional service call to each of the channel's script:
script:
sirius_classicrewind:
alias: Sirius Classic Rewind
sequence:
- service: rest_command.play_sirius_station
data:
station_id: "classicrewind"
# Show currently playing station
- service: input_text.set_value
target:
entity_id: input_text.sirius_now_playing
data:
value: "Classic Rewind"
I also added an input_text box so that I can call any channel ID that might not have a shortcut button:

This way I can limit the number of shortcut buttons on the dashboard to the most common/favorite stations, but still call up any station just be entering any valid channel ID in this box. Entering a value fires an automation that works very similar to the button scripts and calls the rest_command, passing the value entered in the text box:
automation:
- alias: Sirius Manual Channel
trigger:
platform: state
entity_id: input_text.sirius_manual_channel
action:
- service: rest_command.play_sirius_station
data:
station_id: "{{ states('input_text.sirius_manual_channel') }}"
Of course, any input helpers (e.g. input_text) have to be manually created either in YAML or via the Helpers UI editor. But you can create any sort of dashboard that meets your needs.
Part 2 - Building the Touch Screen Interface

While the Home Assistant dashboard provided a way to easily select and play different SiriusXM channels, changing channels still meant that I had to launch Home Assistant in a browser, navigate to the Sirius subview and then select the desired station. Well, since I like to channel surf a bit, this wasn't always the most convenient. So I set out to build a standalone touch interface that would allow me to select from a list of favorite channels and stream directly from my local SiriusXM stream server straight to the DIY amp. And since the amp was nearly perfect in every other aspect, I wanted to do this without any modifications to the existing amp (if I were to build a new amp from scratch today, I might integrate a touch interface.. but that ship has sailed and it would have required the amp to be quite a bit bigger and I am very happy with the current size).
Parts List
As with all my DIY projects, I like to provide a list of the parts I used in my build. You may be able to substitute or source parts from other sources, but this is what I used.
|
QTY |
Description |
Notes |
|
1 |
|
|
|
1 |
ESP32 VROOM 32 NodeMCU (30-pin) |
|
|
1 |
After initial
flashing just a microUSB power cable is needed. Length is whatever you need to reach a
power source. |
|
|
-- |
If using a PCB |
|
|
-- |
If not using a
PCB |
|
|
|
|
|
|
|
|
|
|
|
Additional Parts for
3D Printed Enclosure |
|
|
4 |
|
|
|
4 |
|
|
|
|
|
|
|
|
|
|
Some of these links may be Amazon affiliate links. Use of these links will not affect your pricing, but this channel may earn a small commission if you make a purchase.
You can find the 3D printed design files (once again, credit to Dorffmeister) on Thingiverse. I'm unable to print parts for others (so please do not ask), but there are numerous online sources than can print the parts for you using the design files you can obtain from the Thingiverse link.
Assembling the Display
I'm going to cover two separate approaches to building the display. The first will be using a PCB designed by Kevin... and obviously makes assembly much easier as no wiring is needed! If you want to use a PCB, Kevin has graciously made the gerber design file available, and there is a link to that at the end of this article. Using that design file, you can find multiple online services that will manufacture the PCB for you for only a few dollars each. Sorry, but neither Kevin nor I can sell and send you the PCB boards.
The second method will be the manual wiring method. This functions exactly the same, but just takes a little more work as you have to do all the wiring yourself that the PCB would provide.
Using a PCB
 |
| Click to enlarge |
As mentioned, Kevin Dorff designed the PCB, so all credit to him. Assembly in this case is pretty easy. Just line up the pins on the ESP32 with those on the PCB and solder into place.

The ILI9341 display will work in much the same way, except it will be mounted from underneath with the pins sticking up through the top of the PCB. But before soldering this in place, there are a couple of things to do.
First, it can be helpful to keep the ILI9341 level and parallel to the PCB. To do so, you can insert an extra row of spacers onto the pins of the display.
 |
| My extra row are the black ones on top of the yellow |
To get this extra row of spacers, I just took some extra pin headers and a couple pairs of needle-nosed pliers and removed the existing pins.

I then slid the spacers over the rather long pins on the ILI9341 display.
You'll also probably note that the standard pins on the ESP32 are long enough that they will sit on top of the SD card reader on the back side of the display. I did two things here.
 |
| Click to enlarge |
First, I trimmed the extra length off the pins of the ESP32 that were over the top of the SD card reader. Then as an extra precaution, I applied a couple layers of Kapton tape on top of the SD card reader. This prevents the pins from coming into contact with the metal of the card reader. You could substitute electrical tape if you don't have any Kapton tape handy. It also allows the display and PCB to mount more parallel to one another and takes stress off of the display pins. Here's another picture:

Other than that, the build with the PCB is complete. You are ready to move on to the code and code installation which follows the section on manually wiring the display.
Manually Wiring
Manual wiring might be a bit tricky if you want to keep the total package around the same size as the PCB version. Here is the schematic from the PCB (courtesy Kevin Dorff) that needs to be recreated via manual wiring:
 |
| Click to enlarge |
So, translating that over to a wiring diagram, you will need to wire the ESP32 to the ILI9341 like this:
 |
| Click to enlarge |
A few items to note:
The MISO, MOSI and Clock pins are joined together from the ILI9341 and fed to a single pin on the ESP32. It might be a bit easier if you use solid core wire as opposed to stranded and you may need to either remove/desolder the pin headers from both boards (or find versions that come without pin headers... if you can).
But it is possible. Here is Kevin's initial version completed via manual wiring:

Just be sure that no pins or stray wires are touching, and just like the PCB version, be sure that nothing from the ESP32 is touching the SD card reader of the ILI9341 (use Kapton tape or other another insulator if needed).
Regardless of whether you use the PCB or manually wired version, the rest of the article is the same. Now it is time to create the ESPHome file that will run on the ESP32.
Creating the ESPHome Code
If you've just used ESPHome for some standard sensors or inputs (much like I had) this is going to be a bit more than that! We are going to import a special library that Kevin developed for the ILI9341 touch display and we are also going to create our own Arduino/C++ .h (header) file that we will import. This .h file will define the pages, various touch panels, colors and text and what to do when a panel is touched. Don't worry... you don't have to be a C++ expert to use this. You generally won't need to make any changes to Kevin's library and I'll explain each part of the .h file below. In addition, my entire .h file will be available in my Github repo. Kevin also has some examples of how he uses the touch screen for other things like door locks or temperature display. I'll include links to his examples as well. You can find all those links at the end of this article. So, while I'll be covering exactly how I implemented this for my SiriusXM service, this information can easily be adapted to your own project.
Creating the .h (header) File
First it is important to understand some basic terminology here. For my display, I have multiple pages and each page has multiple panels.

Each touch area on a page is a panel. The up and down arrows on the right navigate between pages and the home icon returns to page0. Each of these menu buttons are also individual panels. You can have as many pages as you like (well, at least as many as the ESP32 can handle) and each page can have different panel sizes and shapes. This is what we will be laid out in the .h header file. Here is the beginning of that file:
Note: It is recommend that you do NOT try to copy and paste code from here in the blog directly into your own .h file. If you wish to copy my code as your own starting point, please use the copy of the code in my Github Repository... linked at the end of this article.
#include <display-panel.h>
// The current page number.
int pageNumber = 0;
// Max page number (zero based)
int maxPageNumber = 3;
// Last touched page
DisplayPanel* lastTouchedPanel = NULL;
// The display/lcd we are working with. Defined in initializePanels().
esphome::display::DisplayBuffer* lcd = NULL;
// For sprintf calls.
char buffer[25];
#define WIDTH 320
#define HEIGHT 240
// Convert percentage width or height (0-100) to pixels
// for easier panel layout.
#define PW(PCT_WIDTH) (PCT_WIDTH * 0.01 * WIDTH)
#define PH(PCT_HEIGHT) (PCT_HEIGHT * 0.01 * HEIGHT)
For the first part of this file, you should not need to change anything except the number of pages you wish to have. The page numbers are zero-based, so if you have four pages like I do, then the maxPageNumber should be 3 (0, 1, 2, 3).
The #include statement just includes the touch display library (which you'll see in the main ESPHome file in a minute). The rest just initializes the panel and defines some constants that you can used for your panels in terms of percentages of the overall width and height... instead of using pixels. For example, if you want a panel that is 25% of the width and 33% of the height of the display, you can use PW(25) for the width and PH(33) for the height. If you want this panel placed half way down the display, you can use PH(50) for the 'Y' position.
 |
| Click to enlarge |
You'll see this used next.
Now we have to define all the panels that will be used across all the pages. However, if a panel is going to be used on more than one page (like the menu buttons), they only have to be defined once. Each panel is defined by its X and Y position on the display... and by its width and height.
// The Panels used by this app. Params are (X, Y, W, H)
// Menu buttons (right most column)
DisplayPanel panelHome(3 * PW(25), 0 * PH(33), PW(25), PH(33));
DisplayPanel panelUp(3 * PW(25), 1 * PH(33), PW(25), PH(33));
DisplayPanel panelDown(3 * PW(25), 2 * PH(33), PW(25), PH(33));
//Page 0 - system settings (use blanks to keep 9 elements for array)
DisplayPanel panelStandby(PW(5), PH(4), PW(65), PH(28));
DisplayPanel panelBootTFT(PW(5), PH(36), PW(65), PH(28));
DisplayPanel panelBootAmp(PW(5), PH(68), PW(65), PH(28));
// Create 3 x 3 grid of equal panels for each favorites page
//Page 1
DisplayPanel page1_01(0 * PW(25), 0 * PH(33), PW(25), PH(33));
DisplayPanel page1_02(1 * PW(25), 0 * PH(33), PW(25), PH(33));
DisplayPanel page1_03(2 * PW(25), 0 * PH(33), PW(25), PH(33));
DisplayPanel page1_04(0 * PW(25), 1 * PH(33), PW(25), PH(33));
DisplayPanel page1_05(1 * PW(25), 1 * PH(33), PW(25), PH(33));
DisplayPanel page1_06(2 * PW(25), 1 * PH(33), PW(25), PH(33));
DisplayPanel page1_07(0 * PW(25), 2 * PH(33), PW(25), PH(33));
DisplayPanel page1_08(1 * PW(25), 2 * PH(33), PW(25), PH(33));
DisplayPanel page1_09(2 * PW(25), 2 * PH(33), PW(25), PH(33));
//Page 2
DisplayPanel page2_01(0 * PW(25), 0 * PH(33), PW(25), PH(33));
DisplayPanel page2_02(1 * PW(25), 0 * PH(33), PW(25), PH(33));
DisplayPanel page2_03(2 * PW(25), 0 * PH(33), PW(25), PH(33));
DisplayPanel page2_04(0 * PW(25), 1 * PH(33), PW(25), PH(33));
DisplayPanel page2_05(1 * PW(25), 1 * PH(33), PW(25), PH(33));
DisplayPanel page2_06(2 * PW(25), 1 * PH(33), PW(25), PH(33));
DisplayPanel page2_07(0 * PW(25), 2 * PH(33), PW(25), PH(33));
DisplayPanel page2_08(1 * PW(25), 2 * PH(33), PW(25), PH(33));
DisplayPanel page2_09(2 * PW(25), 2 * PH(33), PW(25), PH(33));
//Page 3
DisplayPanel page3_01(0 * PW(25), 0 * PH(33), PW(25), PH(33));
DisplayPanel page3_02(1 * PW(25), 0 * PH(33), PW(25), PH(33));
DisplayPanel page3_03(2 * PW(25), 0 * PH(33), PW(25), PH(33));
DisplayPanel page3_04(0 * PW(25), 1 * PH(33), PW(25), PH(33));
DisplayPanel page3_05(1 * PW(25), 1 * PH(33), PW(25), PH(33));
DisplayPanel page3_06(2 * PW(25), 1 * PH(33), PW(25), PH(33));
DisplayPanel page3_07(0 * PW(25), 2 * PH(33), PW(25), PH(33));
DisplayPanel page3_08(1 * PW(25), 2 * PH(33), PW(25), PH(33));
DisplayPanel page3_09(2 * PW(25), 2 * PH(33), PW(25), PH(33));
DisplayPanel flashPanel(PW(5), PH(20), PW(90), PH(50));
The first three panels are the right side navigation buttons (up, down and home). These will be repeated on each page. Then each of the "channel shortcut" pages have nine identical panels... each 25% of the width and 33% of the height of the display.
The final panel is a special "flash panel" that can be used to flash text temporarily on the screen. I use this to briefly flash the channel selected when a button is pressed:
 |
| Flash panel |
You can define the panels in any order and in any size or position as you like to meet your needs.
Next, we have to group those panels into the 'pages' we want.
//Setup pages with panels
std::vector<std::vector<DisplayPanel*>> pages = {
{ //Page 0 - System
&panelStandby,
&panelBootTFT,
&panelBootAmp,
&panelHome,
&panelUp,
&panelDown
},
{
// Page 1.
&page1_01,
&page1_02,
&page1_03,
&page1_04,
&page1_05,
&page1_06,
&page1_07,
&page1_08,
&page1_09,
&panelHome,
&panelUp,
&panelDown
},
{
// Page 2.
&page2_01,
&page2_02,
&page2_03,
&page2_04,
&page2_05,
&page2_06,
&page2_07,
&page2_08,
&page2_09,
&panelHome,
&panelUp,
&panelDown
},
{
// Page 3.
&page3_01,
&page3_02,
&page3_03,
&page3_04,
&page3_05,
&page3_06,
&page3_07,
&page3_08,
&page3_09,
&panelHome,
&panelUp,
&panelDown
}
};
Note that the 'menu' panels are included for each page so they will always be shown in the same position, regardless of which page is shown. The 'flash panel' is not shown on any page by default, but can be 'flashed' onto the screen on top of any page. Again, you can reduce, reorder or add any panels to any page to meet your needs.
Next, we have to define the back color, text color and actual text or icons for each panel. These are just the initial values and can be changed in response to certain events or triggers if desired... but I'm just using static text (or icon) for everything except for the flash panel. Fonts, colors and icons will be defined in the ESPHome file, coming up in a bit. But when it comes to icons, you can pretty much use just about any of the standard material design icons that you use for Home Assistant. And for now, just know that you can get the code for those icons from the material design icons website:
 |
| Click to enlarge |
For any icons we wish to use, we have to set this as the 'text' for those panels:
std::vector<std::string> panelHomeText = { "\U000F02DC" };
std::vector<std::string> panelUpText = { "\U000F0062" };
std::vector<std::string> panelDownText = { "\U000F004A" };
These icons will also have to be defined as "glyphs" in the ESPHome file, which is also described below. For the rest of the panels that will just display text, we will use the fonts and colors that we will define in ESPHome.
void initializePanels(esphome::display::DisplayBuffer &display) {
lcd = &display;
//Page 0 - System
panelStandby.font = font_button_label;
panelStandby.color = color_green;
panelStandby.textColor = Color::BLACK;
panelStandby.touchable = true;
panelStandby.text = {"STANDBY"};
panelStandby.name = "Standby";
panelStandby.tag = "script.sirius_power_down_amp";
panelBootTFT.font = font_button_label;
panelBootTFT.color = color_blue;
panelBootTFT.textColor = Color::WHITE;
panelBootTFT.touchable = true;
panelBootTFT.text = {"Reboot TFT"};
panelBootTFT.name = "BootTFT";
panelBootTFT.tag = "script.sirius_reboot_tft";
panelBootAmp.font = font_button_label;
panelBootAmp.color = color_red;
panelBootAmp.textColor = Color::WHITE;
panelBootAmp.touchable = true;
panelBootAmp.text = {"Reboot Amp"};
panelBootAmp.name = "BootAmp";
panelBootAmp.tag = "script.sirius_reboot_amp";
//Page 1
page1_01.font = font_button_label;
page1_01.color = color_red;
page1_01.textColor = Color::WHITE;
page1_01.touchable = true;
page1_01.text = {"Clssc", "Rwnd"};
page1_01.name = "Classic Rewind";
page1_01.tag = "script.sirius_classicrewind";
page1_02.font = font_button_label;
page1_02.color = color_green;
page1_02.textColor = Color::BLACK;
page1_02.touchable = true;
page1_02.text = {"Clssc", "Rock"};
page1_02.name = "Classic Rock";
page1_02.tag = "script.sirius_classicrock";
page1_03.font = font_button_label;
page1_03.color = color_blue;
page1_03.textColor = Color::WHITE;
page1_03.touchable = true;
page1_03.text = {"Clssc", "Vinyl"};
page1_03.name = "Classic Vinyl";
page1_03.tag = "script.sirius_classicvinyl";
page1_04.font = font_button_label;
page1_04.color = color_cyan;
page1_04.textColor = Color::BLACK;
page1_04.touchable = true;
page1_04.text = {"70s", "on", "7"};
page1_04.name = "70s on 7";
page1_04.tag = "script.sirius_70son7";
page1_05.font = font_button_label;
page1_05.color = color_magenta;
page1_05.textColor = Color::WHITE;
page1_05.touchable = true;
page1_05.text = {"80s", "on", "8"};
page1_05.name = "80s on 8";
page1_05.tag = "script.sirius_80son8";
page1_06.font = font_button_label;
page1_06.color = color_red;
page1_06.textColor = Color::WHITE;
page1_06.touchable = true;
page1_06.text = {"70/80s", "Pop"};
page1_06.name = "70s/80s Pop";
page1_06.tag = "script.sirius_7080pop";
page1_07.font = font_button_label;
page1_07.color = color_red;
page1_07.textColor = Color::WHITE;
page1_07.touchable = true;
page1_07.text = {"Red", "White", "Booze"};
page1_07.name = "Red White Booze";
page1_07.tag = "script.sirius_redwhitebooze";
page1_08.font = font_button_label;
page1_08.color = color_green;
page1_08.textColor = Color::BLACK;
page1_08.touchable = true;
page1_08.text = {"Road", "House"};
page1_08.name = "Willies Roadhouse";
page1_08.tag = "script.sirius_roadhouse";
page1_09.font = font_button_label;
page1_09.color = color_blue;
page1_09.textColor = Color::WHITE;
page1_09.touchable = true;
page1_09.text = {"Road", "Trip"};
page1_09.name = "Rdtrip Radio";
page1_09.tag = "script.sirius_roadtrip";
//etc... repeat for other pages and panels
For each panel, you include the following information:
- .font - The font to use for the text. Fonts are defined in ESPHome (see below)
- .color - The background color of the panel (again, defined in ESPHome)
- .textcolor - The color of the text
- .touchable - whether this panel should respond to touch. Set to false for a panel that is just displaying some informational text (say something like temperature)
- .text - The text to display. To display in multiple rows, separate each row of quoted text with a comma
- .name - Any text string you want to use for any other purpose. I use it as the text to display in the flash panel
- .tag - Any text string you wish to use for any other purpose. In my case, I'm listing the Home Assistant script that will run when this panel is touched
- These scripts were defined waaaaay back at the start of this article under part one and the section on interfacing the amp with Home Assistant
// Menu
panelHome.font = icon_font_45;
panelHome.color = color_yellow;
panelHome.textColor = Color::BLACK;
panelHome.touchable = true;
panelHome.text = panelHomeText;
panelHome.name = "Home";
panelUp.font = icon_font_45;
panelUp.color = color_yellow;
panelUp.textColor = Color::BLACK;
panelUp.touchable = true;
panelUp.text = panelUpText;
panelUp.name = "Prev Page";
panelDown.font = icon_font_45;
panelDown.color = color_yellow;
panelDown.textColor = Color::BLACK;
panelDown.touchable = true;
panelDown.text = panelDownText;
panelDown.name = "Next Page";
flashPanel.font = font_flash;
flashPanel.color = Color::BLACK;
flashPanel.textColor = Color::WHITE;
flashPanel.touchable = false;
flashPanel.drawPanelOutline = true;
flashPanel.enabled = false;
The only real difference here from the standard "shortcut" panels is that the menu panels are using a special 'icon_font', that again will be defined in ESPHome. These panels do not include a .tag because they will not be launching a script via Home Assistant, and the flash panel has its own font, isn't touchable and has the outline enabled.
The rest of the .h code is just handling the brightness of the panel (as defined in ESPHome), drawing and refreshing the panels and displaying the flash panel. You should not need to modify any of this unless you have special needs:
// Backlight initial level
backlight->set_level(brightness->value());
// Fill the screen the first time to have BLACK in any gaps in Panels.
display.fill(Color::BLACK);
}
// The time until which to display flash
esphome::time::ESPTime flashUntil;
// Enable the Flash message with some specific text
void enableFlash(std::vector<std::string> flashText) {
flashUntil = esptime->now();
flashUntil.increment_second();
flashPanel.enabled = true;
flashPanel.text = flashText;
}
void updatePanelStates() {
//
// Update configuration for Panels that might have changed.
//
auto now = esptime->now();
if (flashPanel.enabled && now > flashUntil) {
flashPanel.enabled = false;
}
}
// Draw all of the panels
void drawPanels() {
// drawAllPanels is generally preferred
DisplayPanel::drawAllPanels(*lcd, pages[pageNumber]);
// But draw flashPanel separately so it over-draws
// what is below it.
flashPanel.draw(*lcd);
}
// See if one of the enabled, touchable panels on the
// current page has been touched.
// lastTouchedPanel will be set to a pointer to the
// touched panel (or NULL of no panel was found for the coordinates).
boolean isPanelTouched(int tpX, int tpY) {
lastTouchedPanel = DisplayPanel::touchedPanel(pages[pageNumber], tpX, tpY);
return lastTouchedPanel != NULL;
}
Once you have finished editing your file, save it under any name you like with a .h file (I called my sirius-tft-monitor.h) and copy or upload the file to your Home Assistant config/esphome folder:

Now we are ready to move on to creating the ESPHome file.
Note: If you make changes to the .h file or update the version of the display library after the initial load of the ESPHome file to the ESP32, you must first clean the build files in ESPHome. See the section below on troubleshooting and updating for more information.
Creating the ESPHome Node
The installation of a new ESPHome node and flashing it to your ESP32 is pretty much just like any other ESPHome device, so I won't be covering that here. If you've never used ESPHome, I recommend you review the Getting Started with ESPHome and Home Assistant documentation. Again, what I will be covering is specific to my particular use case, but could easily be adapted for your own project. I will only cover the part of the ESPHome yaml code that isn't "standard" (such as wifi information and other 'default' information that is part of every ESPHome file).
Importing header and library
esphome:
name: sirius-tft
includes:
- sirius-tft-monitor.h #This is the .h file you created above
libraries:
- esphome-display-panel=https://github.com/kdorff/esphome-display-panel.git#v0.0.13
There may be a few things here at the top of the file that you might not have seen or used in an ESPHome file before. The name is just whatever you called the node when you created it. It can be anything you like... mine is just sirius-tft.
But now we are going to include that header .h file that was created above. Remember that this file needs to be in your /esphome folder under the default configuration of your Home Assistant. If you created this file locally in a text editor, you can upload it via the Home Assistant file editor by first navigating to the /esphome folder and using the upload button. Or you can use FTP, an SMB mapped drive, etc. Just assure the name of the file in the include statement above matches the name you gave to your .h file.
We are also going to import the special library created by Kevin Dorff for the touch display. This line does need to be entered exactly as shown above. The only exception might be the tag number (v0.0.13) at the end if he releases a later version. But check his Github repo for any updates or notes. For this project, v0.0.13 was used and worked just fine.
Adding an ID to the API:
api:
encryption:
key: your-random-encryption-key
id: api_server
The api section, including the encryption and key should be created for you when you first create the ESPHome node. If not, you need to add this section. But regardless of whether it is created for you or you add it yourself, an internal id needs to be added as shown above. This id will be used in the code below to launch a Home Assistant script when one of the touch screen buttons are pressed. So, just be sure you have an id: under your api entry. The name is arbitrary, but you need to use this same name in the automation below.
Defining Colors
color:
- id: color_red
red: 100%
green: 0%
blue: 0%
- id: color_green
red: 0%
green: 100%
blue: 0%
- id: color_blue
red: 0%
green: 0%
blue: 100%
- id: color_magenta
red: 100%
green: 0%
blue: 100%
- id: color_cyan
red: 0%
green: 100%
blue: 100%
#etc... add other colors as needed
In this section, we need to define any colors that you used (or want to use) in your header (.h) file above. You can create as many colors as you like, defined as simply combination of (r)ed, (g)reen and (b)lue values. Just be sure each has a unique ID and that this the same name you use in the .h file. You do not need to define white or black (although you could), as the .h file uses a standard nomenclature of Color::WHITE and Color::BLACK for these values. But you could define white and black and use your own definitions in the .h file if you desire.
Defining Fonts
font:
- file: "gfonts://Rubik@600"
id: font_flash
size: 30
- file: "gfonts://Rubik@500"
id: font_button_label
size: 22
Similar to colors, we now have to include and define any fonts we want to use in the header (.h) file and on the display. I'm opting to use Google fonts, as this doesn't require installing any special font files within ESPHome.... they will be pulled in as needed. You can see a list of all the available fonts and variations on the Google fonts web site. For each font, you select the font name and style as shown above, along with the size. Each defined font will also have a unique ID that you will use in the .h file. Like colors, you can define as many fonts as you like for use on the display. Google fonts will be automatically downloaded and cached so you don't need to download and install any font files. However, if you wish to use other fonts, please see the ESPHome guide on fonts and you'll need to install those font files in the /esphome folder. I'm only using two Google fonts in my case.
Including icons
To use material design icons on the display, we do need to install the material design icon font locally in a /esphome/fonts folder on the Home Assistant machine. You then need to specify which icons (glyphs) you want to include. This section goes under the font: section above.
- file: 'fonts/materialdesignicons-webfont.ttf'
id: icon_font_45
size: 45
glyphs:
- "\U000F02DC" # 'home'
- "\U000F0062" # 'up arrow drop circle'
- "\U000F004A" # 'down arrow drop circle'
First, if it does not already exist, create a /fonts folder under your /esphome folder of your Home Assistant configuration.

Upload or transfer a copy of the materialdesignicons-webfont.ttf file (a copy of this is in my DIY Amp Github repo) into the /esphome/fonts folder.
You then need to provide an ID for use in the .h file, specify a size and then define which icons (glyphs) you want import and use. As described under the section on the .h file, you can get the five character code for the icon from the Material Design Icon web site. You then just need to precede this code with "\U000" for each icon as shown in my above example.
 |
| "\U000F02DC" would be used in the ESPHome and .h files |
You then specify the same glyph code as the "text" for a panel in the .h file (see above).
Globals
This may also be something that you may not have used or seen in ESPHome before. But you can define global variables that can retain their value between Home Assistant and/or ESPHome device restarts.
globals:
- id: brightness
type: float
restore_value: yes
initial_value: "1.0"
In this case there is just one global, brightness, that controls the overall brightness of the display. This global could allow you to have touch buttons on the display to change the brightness level (Kevin does this in one of his examples - See his Github ESPHome repo). I include this as well (because it is used in the .h file), but I chose to include a light entity that is exposed to Home Assistant.
light:
- platform: monochromatic
output: backlight #defined below
name: "Sirius TFT Backlight"
id: tft_backlight
restore_mode: ALWAYS_ON
This allows me not only to control the brightness via Home Assistant, but I will use the state of this light in my automations to power up the display and the DIY amp if the state of this light is "off". More on this below. I'm using a platform of monochromatic because I only want to control brightness in Home Assistant and not the color. Note that the 'name:' above is what will be exposed to Home Assistant (e.g. light.sirius_tft_backlight), but the 'id:' is what we will use internally in the ESPHome code to refer to this entity.
 |
| Home Assistant Light Entity Display Example |
Defining the Display and Output Entities
Now we define the display and output, pretty much like any other ESPHome entity:
display:
- platform: ili9xxx
model: TFT 2.4
cs_pin: 33
dc_pin: 5
reset_pin: 16
rotation: 270
## The panels will redraw themselves completely.
auto_clear_enabled: True
update_interval: 0.1s
lambda: |-
static bool panelsInitialized = 0;
if (!panelsInitialized) {
initializePanels(it);
panelsInitialized = true;
}
updatePanelStates();
drawPanels();
# Define a PWM output on the ESP32
output:
- platform: ledc
pin: 17
id: backlight
The display is defining the pins used on the ESP32. Unless you have used other pins, these should not need to be changed. You can change the rotation if you opt to use the display in portrait instead of landscape orientation (or flipped upside down). The lambda is making function calls to the libraries and shouldn't be changed unless you are using your own libraries.
The output is used both in the code for brightness and by the defined light entity above. Note that neither of these entities have a 'name' property, so they will not be exposed to Home Assistant as entities. They aren't really needed, nor should they be modified directly via Home Assistant.
Defining the touchscreen and automation
Next is the touch definition for the display. I'll talk about the automation that is part of this definition following this section:
touchscreen:
platform: xpt2046
id: touch
cs_pin: 32
interrupt_pin: 21
swap_x_y: false
##
## From running calibration (code is commented out, below)
## for rotation: 0 these were good
## minx=426, maxx=3771, miny=471, maxy=3845
calibration_x_min: 426
calibration_x_max: 3771
calibration_y_min: 3845
calibration_y_max: 471
## Help eliminate phantom presses
threshold: 400
update_interval: 50ms
report_interval: 200ms
These are the values that worked out for me and the ILI9341 model I purchased and should work fine with most other models as well. But you can tweak the calibration numbers, threshold and update_intervals if you find your touch is not quite aligned or the touch is either too responsive (ghost touches) or not responsive enough. Again, don't change the pin values unless you wired your display differently. And this won't be exposed to Home Assistant either, since no name: property is defined.
Now, included under the touchscreen is the automation that will run when the display is touched. Most of this is within C++ lambdas, but I'll try to explain what each section is doing so that you can adapt to your own needs (again, don't try to copy the code here... it may be word-wrapped for display purposes. Instead use the code from the Github repository):
on_touch:
then:
- if:
condition:
lambda: |-
return isPanelTouched((id(touch)).x, (id(touch)).y);
then:
- lambda: |-
ESP_LOGD("yaml", "touched name=%s", (lastTouchedPanel->name.c_str()));
// If backlight is ON (amp is powered up)
if (id(tft_backlight).current_values.is_on()) {
if ((lastTouchedPanel != &panelUp) && (lastTouchedPanel != &panelDown)
&& (lastTouchedPanel != &panelHome)) {
enableFlash({"Launching:", (lastTouchedPanel->name.c_str()) });
HomeassistantServiceResponse resp;
resp.service = "script.turn_on";
HomeassistantServiceMap entity_id_kv;
entity_id_kv.key = "entity_id";
entity_id_kv.value = lastTouchedPanel->tag.c_str(); //"script.sirius_classicrewind";
resp.data.push_back(entity_id_kv);
id(api_server).send_homeassistant_service_call(resp);
Each time the panel is touched, this local ESPHome automation will execute. Much like Home Assistant automations, it has a trigger (on_touch), a condition and actions. When a touch occurs, it is going to check a condition by running one of the library functions 'isPanelTouched'. This checks to see if the area touched is within a panel that has its touchable property set to true. If not, then the rest of the automation is not executed.
If the panel is touchable, it is going to log an ESPHome message, including the .name property (as defined iof the .h file for the panel). This isn't technically necessary, but can be extremely helpful for troubleshooting and when first setting up your displays and panels. The prior condition function also logs the x/y coordinates and first line of text for the touched panel. You can click the Logs link under the ESPHome module and watch what is returned as you touch the display:

Next, in my case, I'm checking the state of the panel backlight. For me, I'm using this state to decide whether to power on the amp (as powering down the amp also powers down the display backlight). If the backlight is on, then I want to execute a command or script related to the panel touched. Otherwise, as you'll see below, I want to power up the amp and display.
Assuming the amp and backlight are on, I first want to make sure that none of the side 'menu' buttons (home, page up, page down) is the panel touched... as again, I handle those differently below. If the panel is one of the other buttons on any page, then:
I first display the 'flash panel' on the display for approx. 1 second using the .name property of the panel as feedback to the user. I then execute a Home Assistant script, as defined in the .tag property of that panel. This is done by calling the script.turn_on service and then defining a key/value pair (KV) that is normally the "data:" portion of a script.... entity_id and the script name (which again is coming from the .tag property of the panel). You can basically execute any script from Home Assistant in this manner by referencing the API (and using the ID you gave the API up above) . So, this same process works for my standby and reboot buttons as those are the script names assigned to the .tag property of the panel in the .h file. The actual scripts are defined back in Part one, interfacing the amp with Home Assistant.
Menu buttons and backlight
As mentioned above, a test is run to see if any of the panels touched were one of the special side navigation buttons. If it is, then we want to process this locally (not by calling a Home Assistant script), just to change the display page on the display:
} else if (lastTouchedPanel == &panelDown) {
if (pageNumber < maxPageNumber) pageNumber++;
} else if (lastTouchedPanel == &panelUp) {
if (pageNumber > 0) pageNumber--;
} else if (lastTouchedPanel == &panelHome) {
pageNumber = 0;
}
As you can see above, touching one of the navigation panels just changes the pageNumber. The library will automatically handle updating the display when the page number changes. Checks are just added so that the page number cannot go below zero or exceed the maxPageNumber as defined in the .h file.
Finally, when I'm done using the amp for a while, I place it into standby mode. When the amp goes into standby mode, it turns off its own LED display and also turns off the touchscreen backlight... no need to have this lit up when the amp is not in use. The amp can be placed in standby mode from Home Assistant, a button on the amp itself, or from page0 of the touch interface (as shown in the picture above). I also wanted to be able to 'wake' the amp or take it out of standby mode using any of the same three methods.
// Backlight is off (amp is in standby - wake amp - which will turn on backlight)
} else {
HomeassistantServiceResponse resp;
resp.service = "script.turn_on";
HomeassistantServiceMap entity_id_kv;
entity_id_kv.key = "entity_id";
entity_id_kv.value = "script.sirius_power_up_amp";
resp.data.push_back(entity_id_kv);
id(api_server).send_homeassistant_service_call(resp);
}
So if the touch screen is touched and the backlight is off (it doesn't matter where it is tapped on the blank screen), it wakes up the amp by again calling a script (script.sirius_power_up_amp) in Home Assistant.
Troubleshooting and Updating tips
Not-Responsive Touch
If you find that your display is not responding to touch commands (but everything else appears to work), it seems that some particular models of the ILI9341 have an issue with initialization of the touch interrupt. To resolve this issue, simply remove or remark out (place a # at the start of the line) the following line under the touch panel definition in the ESPHome file:
#interrupt_pin: 21
Save the file and upload to the ESP32. Testing seems to show that disabling the IRQ_Touch pin fixes non-responsive touch on these models.
Updating the Header (.h) or the Display Library
If you make changes to the .h file or if you change the tag for a new release of Kevin's display library after you've initially compiled and uploaded the ESPHome file to the ESP32, you must force ESPHome to do a full recompile for these changes to be included. This is very simple to do.

Simply click the 3 dots for your display node in ESPHome and select "Clean Build Files". This will force a complete recompile and will include any changes made to the header/library. You can then install the new file. If you find you've made changes to the .h file (such as changing panels, text, etc.) and you don't see those changes, be sure you've cleaned the build files. Otherwise, your changes won't be included.
Final Results and Conclusions

The addition of a local SiriusXM streaming server and the ILI9341 touch display rounded out a couple of features that were initially lacking for me.
One was the ability to stream SiriusXM channels directly to the amp without the use of a secondary device like a phone and bluetooth... both draining my phone's battery and requiring me to use the phone to launch and stop the service. This was resolved by Part one of this rather lengthy article.
But even after this was added, it still required that I launch Home Assistant, navigate to the Sirius subview of the amp dashboard page to simply change channels. The ILI9341 touch panel resolved this last issue. While Home Assistant is still used for automations and scripts, I no longer need to use the Home Assistant interface to play any of my favorite stations or control all the basic features of the amp. The Home Assistant interface, while it can still be used for these controls, is really only needed if I want to occasionally change more advanced (but rarely accessed) functions, such as treble, bass, midrange settings or changing things like turning on or off other options, like the LED indictor.
Other Uses and Ideas
Now it is probably unlikely that you've created an amp exactly like mine, have a SiriusXM subscription and want to access it just like I do. But hopefully I've provided enough information that you might be able to take these ideas and modify them for your own project needs.
For example, you may be able to create your own local streaming server for other services besides SiriusXM... especially if they provide some sort of public API. Why would you want to have a local server for a service you can already stream? Well for one, these other services likely require you to use their web interface or a separate device like a phone... meaning you need to access a computer or use your phone (and battery if streaming) to listen to that music. Having your own local server allows you to connect directly to that server via multiple methods, including Home Assistant.
As far as the touch interfaces, there are a ton of potential uses for Home Assistant. In the links below for Kevin's ESPHome, he has some other examples such as a clock and temperature display and a touch option for locking/unlocking doors (and letting him tell at a glance their state). The ability of the display to not only show states of Home Assistant entities, but to be able to run scripts in response to a touch provides a huge number of possibilities. Let me know down in the comments how you've made use of either a local streaming server or a custom touch interface.
And thanks for reading!
Links and More Information:
Code used in this article, font files and more information regarding the amp:
Kevin Dorff's Library and other graciously provided files :
ESPHome Examples (see the tft- examples for using the display)
General information and other links mentioned:
More information on the DIY Amp Project
Video overview of this project (YouTube video)
Building the Amp Article (Written guide)
Supporting this blog and related YouTube channel
If you'd like to support future content on this blog and the related YouTube channel, or just say thanks for something that helped you out, you can say thanks by buying me a one-off cup of coffee at:
Hi, thanks for your great tuto, easily understandable. By the way, your code won't work anymore on latest esphome versions. Indeed, there are some changes, like 'esphome::display::DisplayBuffer* lcd = NULL;' that should be 'esphome::display::Display* lcd = NULL;' and other things like touch(id).x that must be now touch.x
ReplyDeleteYou can see the updates files on Kevin Dorff git. Cheers
Yeah... Kevin and I communicate on a pretty regular basis. In fact, I notified him of the original issue and he had a fix rolled out in just a couple of hours. I haven't yet updated my code primarily because the API to Sirius XM is broken (or they are now actively blocking it). I'm waiting on a fix from that developer (if one ever comes). Until that time, my touchscreen is really non-functional for its intended purpose as described here, so I haven't done any updates.
DeleteBut I'll try to merge Kevin's changes into mine when I get an opportunity. Regardless, thanks for letting me know about it.
Hi, I understand, anyway, your tutorial is really great and helped me a lot. So keep the good work.
DeleteIs it fixed? It appears to be working for me (installed today) and tested via VLC Media Player. I could open streams just fine.
DeleteThe API appears to be working again (at least for now). In February, Sirius XM did a number of updates to the web app and during that process, the API was broken. Then it was unstable for quite a while... it would connect and play for a few minutes (anywhere from 1-20 minutes), then error off with repeated attempts to reauthenticate. Considering that the API hasn't been updated in over 3 years, any issues are likely be the result of changes on the Sirius side.
DeleteDuring the instability, I defaulted back to using an old phone with the Sirius XM app and wifi to stream to the amp via Bluetooth. While not quite as convenient, it does have the added bonus of being able to access any subscribed channels, including those XTRA channels that do not appear to be accessible via the API (I still haven't found a way to get the channel ID for these). If building some sort of system and if you rely on Sirius XM as much as I do, I'd be sure to have an alternate way to play Sirius content, such as Bluetooth or the web app in the event that future Sirius changes break the API... as it doesn't appear that the original developer is still actively supporting the API.
I am getting an error when I do "docker compose up".
ReplyDeleteI've installed Proxmox on my RPI5 successfully.
The container is running Alpine 3.18.
But when I issue the docker compose I see the following:
! sxm The requested image's platform (linux/amd64) does not match the detected host platform (linux/arm64/v8) and no specific platform was requested 0.0s
Attaching to sxm
sxm | exec /bin/sh: exec format error
sxm exited with code 0
my-sxm:~/docker$
I am trying to understand what the error is telling me.
Searching Google tells me basically the same thing as the error text.
I've followed the instructions in this article, repeating it a few times always resulting in the same error.
Thanks for any assistance.
Well, it's a little difficult to say what the problem is. I'm still running the original container without issue (except when SiriusXM itself has problems). I'm wondering about different versions of Proxmox or even Docker/Docker-compose. I'm still running the original versions (e.g. Proxmox 7.3). I did find a reference exactly matching your error and the resolution was to add a "platform linux/amd64" to the Docker image. Not 100% sure how to add this in a Docker-compose .yml file but I'm guessing that can be found. Let me know if that works, but I'm almost sure the issue has something to do with different versions of Proxmox, Docker, Alpine, etc.
DeleteThanks for the reply.
DeleteAre you running on a Raspberry Pi ?
The reason I ask is because the error indicates a mismatch in platforms. Seems it's expecting Linux/amd64.
Thanks again for any help.
No... I'm not running on a Pi. I have Proxmox installed as the base OS on a bare metal mini-PC (Intel core i3 with 16 GB RAM). Alpine is then installed as a container, so Linux is the OS and the Docker-compose file runs within that. I suppose there could be a difference/update in Docker-Compose? Did you try adding a platform to your YAML file (try adding: "platform: linux/amd64" without the quotes and indented by two spaces under the SXM: key). I don't know if this will make any difference, but it is about the only recommendation I have at this point.
DeleteAfter switching to a mini PC I finally got it working. It only took me a frustrating week :-) I ended up doing a Proxmox bare metal install on the mini pc as you mentioned. Even with this I struggled with the network setup. At first I didn't really understand what was required by Proxmox.
DeleteThanks again for your feedback.
Where did you get the icons for the Sirius XM channels?
DeleteJust wondering where you got the Sirius XM icons for the Sirius XM channels sub-view (Home Assistant)?
DeleteI simply did screen grabs from the web for each channel and then edited them down to size/ratio for the custom button.
DeleteThanks for the reply. I captured a number of images but I can't seem to get them to show up on the buttons. I put the images (jpg files) in the homeassistant/www/sirius directory. It's my understanding that the path /local/sirius is equivilent to homeassistant/www/sirius. Is this correct? Maybe I didn't resize the images correctly? Not small enough?
DeleteYes... the www folder is the same as /local. As you are aware, I have a /sirius subfolder where I have all the button images. My images are .jpg sized to around 500 x 500 pixels (give or take a bit). I'm assuming you are also using the custom buttons? You need to be using custom buttons to display the images as I did. Under the custom button YAML configuration in the dashboard, you need a property like this:
Deleteentity_picture: /local/sirius/classicrewind.jpg
You must also have the line:
show_entity_picture: true
Let me know if you continue to have issues.
More info. It seems to work fine on the main dashboard (SXM button picture) but not on the sub-dashboard buttons (channels).
DeleteUpdate: It seems that the problem is probably in the Chrome browser. When I connect with my phone (android) or Microsoft Edge, the pictures appear on the buttons. Very strange but I am not going to spend anymore time on it. Thanks again for your help.
DeleteThanks for the update. I wonder what is occurring? I pretty much exclusively use Chrome and haven't had the same issue you are seeing. I have Chrome on Windows 10, Windows 11 and also on some tablets and my phone. The images appear in all cases... at least for me.
DeleteHere is the error reported from the Chrome developer tool when loading the sub dashboard;
Deletehttp://homeassistant.local:8123/local/sirius/classicrock_2.jpg 404 (Not Found)
I don't see this error when the main dashboard loads (Sirius.jpg), the path is the same for Sirius.jpg.
Strange, must be something configured in my Chrome (Win 11).
Version 131.0.6778.266 (Official Build) (64-bit)
Interesting... and not sure if I know what is causing it or what the fix might be. Looking at my dashboards, this is the path to the SiriusXM logo on the main page:
Deleteentity_picture: /local/sirius/classicrock_2.jpg
And on the station subpage:
entity_picture: /local/sirius/classicrock_2.jpg
Now the obvious thing to check is the image file name (assure it exists and has the _2 in the name as you show above). From the error, it is like the file /local/sirius/classicrock_2.jpg doesn't exist. Are you sure the name isn't something different like just classicrock.jpg? Obviously, you need to substitute the actual image file names, which may be different from mine. To verify that it is filename related (and not path), try swapping the image on the two buttons. Make the one on the main page /local/sirius/classicrock_2.jpg and the one on the subview /local/sirius/Sirius.jpg. If the classicrock_2 shows on the main page, but the Sirius image doesn't appear on the subview, then it is something about the subview or how you defined the custom buttons on that page. However, if the image is now missing on the main page but showing on the subview, it is the image path/filename that is incorrect. Let me know what you find.
Now I'm working on the Touch display. I'm going to use a CYD (Cheap Yellow Display) which eliminates any wiring since the ESP32 is on the display. I believe I've managed to configure the CYD correctly in the ymal & h file, but I've run into a few issues during the install. In particular in the h file it gives me this error.
DeleteIn file included from src/main.cpp:69:
src/sirius-tft-monitor.h:426:16: error: 'ESPTime' in namespace 'esphome::time' does not name a type
esphome::time::ESPTime flashUntil;
^~~~~~~
This isn't displaying correctly. It is pointing at ESPTime as is shown in the error text.
Thanks
(Sorry... the first entity picture path should have been):
Deleteentity_picture: /local/sirius/siriusxm_2.jpg
The strange thing is it displays correctly on my android phone, Chromebook, my Win 10 laptop (w/Chrome), and my Win 11 laptop (w/Edge) . I'll try reinstalling Chrome on my Win 11 laptop some day.
DeleteOn to the Touch display!
Regarding the touch screen, I do know that an ESPHome update (v2023.7 I believe) broke the original YAML. The original author (KDorff) made a fix. Now, I don't routinely update my ESPHome devices unless there is a problem, so it is possible yet another update after 2023.7 broke something again. I always hate to do this, but I'm going to point you at Kevin's repo and maybe have him look at the issue. He developed this code and I simply fork/clone it. His repo should always have the latest version, so if you haven't already, you may want to point your ESPHome library at his version instead of mine:
ReplyDeletehttps://github.com/kdorff/esphome-display-panel
You can also try contacting him via the issues in the repo if you still have the error. I've found him to be pretty helpful and he knows a lot more about how this library works than I do! I suspect that either an ESPHome or Home Assistant update may have changed something (although I'm on the latest Home Assistant, 2025.1.4, and the display is working fine. But my display is still using ESPHome 2023.10. He'll be able to find/fix it much quicker than me!
Back to the Touch screen project;
ReplyDeleteIt seems the line 123 of the .yaml file
initializePanels(it);
(it) is not defined anywhere that I can find.
Error log:
/config/esphome/sxm.yaml: In lambda function:
/config/esphome/sxm.yaml:126:26: error: invalid initialization of reference of type 'esphome::display::DisplayBuffer&' from expression of type 'esphome::display::Display'
initializePanels(it);
^~
In file included from src/main.cpp:69:
src/sxm.h:142:6: note: in passing argument 1 of 'void initializePanels(esphome::display::DisplayBuffer&)'
void initializePanels(esphome::display::DisplayBuffer &display) {
^~~~~~~~~~~~~~~~
Any suggestion?
Got the Touchscreen working on my CYD (cheap yellow display board). No wiring required :-)
ReplyDeleteFantastic! Been meaning to pickup one of those CYDs and try it out. Just haven't had the need yet.
DeleteI can provide you the .yaml and .h files so you can see the changes I made. Very few changes/additions.
DeleteI appreciate it! But I'll probably just pass those along to Kevin (kdorff) as he is the "keeper" of the upstream library. Mine is just a fork and it is already one commit behind his because I haven't updated my ESPHome nodes yet (and don't know when I will). So I have to keep the old version up in my repo until I opt to also update my ESPHome YAML. It's probably best to reference his library in your ESPHome code instead of mine moving forward. You can see the 'libraries' statement to use in ESPHome in his latest release notes. Alternatively, you can just open an issue in his repo ( https://github.com/kdorff/esphome-display-panel ), posting your original error message along with your fixes. Sorry... not trying to pass the buck, but if I apply any changes to my Github repo, it will break all my ESPHome modules that use it and haven't been updated to the latest ESPHome. As an FYI to others, I'm going to add a note to the main README in my repo.
Delete