

This article is a companion piece to my YouTube video that walks through the entire step-by-step process of installing Proxmox and moving your current Home Assistant install to a new Proxmox virtual machine. This entire process can be done in under an hour with less than 5 minutes of downtime for Home Assistant and doesn't require any specialized Linux or Proxmox knowledge.
I recommended first watching the video, then referring to this article for support when you actually install Proxmox and move Home Assistant. And I think you might be surprised both how easy it is and to find out that it doesn't take high-end, expensive server hardware for Home Assistant on Proxmox... but it offers huge benefits if Home Assistant has become an important part of your home.
Why Move Home Assistant?
If you are like most people, you probably started out with Home Assistant on a Raspberry Pi.

It is a great platform (when you could buy them at a reasonable cost) for trying out Home Assistant. But it does have its limitations. As your Home Assistant grows and become a more integrated part of your household, you may eventually experience slowness or sluggishness due to the limited ability of the Pi. In addition, if you run the Pi using the default storage of a microSD card, there is a very high probability that the card will fail due to the high write rate required by Home Assistant. This will bring your home automation to a halt until you prepare a new card with Home Assistant and restore your backup copy (you do have a backup copy, right?).
Home Assistant Backups
Did you know that a standard Home Assistant backup only contains the configuration of Home Assistant, but not the underlying operating system, hardware configuration or other key components? If something goes wrong with the operating system or the hardware to the point that you can no longer get Home Assistant to start, you will most likely have to start all over... reinstalling Home Assistant, setting up hardware, etc. Then, and only then, will you be able to restore the configuration that you backed up.
At some point in time, you'll probably need to consider moving your Home Assistant to a more powerful and reliable platform with the ability to back up the entire platform.
Why Proxmox?
Proxmox (officially called Proxmox Virtual Environment or PVE) is a "hypervisor" that allows you to run one or more virtual machines on a single computer or server. It shares hardware on the machine among the various virtual machines. For example, you could run copies of Windows, Linux and Home Assistant simultaneously on one computer. Or you could run two or three separate instances of Home Assistant side-by-side on one machine (like a production, test and development version).
In terms of Home Assistant, some of the major advantages are:
- Run on much more powerful hardware for better and more reliable performance
- Create backups of, and easily restore, the entire machine (not just the Home Assistant configuration).
- Utilize snapshots for a quick picture of your system at a given point in time, like before a Home Assistant upgrade. Something not work quite right? Just restore the snapshot to be back at that same point in time.
- Need to run an MQTT broker or some other application like PiHole? Just spin up a new virtual machine or container and run it on the same physical machine as Home Assistant. No need for a separate computer or another Raspsberry Pi.
- Using three separate Proxmox servers, it is possible to setup replication/high-availability so that if the server running Home Assistant fails, it will automatically start back up again on a different server... without any intervention on your part!*
- No microSD card involved!
*High available and replication won't be covered in this article. However, a future article and video are planned on how to set up this environment for Home Assistant if you are interested
Now, the number and type of virtual machines you can run simultaneously is dependent on the power of the computer where Proxmox is installed. But to primarily run Home Assistant and maybe one or two other virtual machines doesn't require a high-end expensive server. I'll cover the minimum and recommended hardware below.
While this is not going to be a Proxmox tutorial, I will cover the steps you need to install and configure Proxmox, along with moving your existing Home Assistant. You don't need to know any programming, Linux commands or advanced knowledge to do this. In fact, it is about as easy as installing Home Assistant on the Pi. There are a couple of scripts that will be used, but those are simply copy/paste operations.
Finally, Proxmox is not the only platform you can use for Home Assistant. There are other virtual environments or systems that can host Home Assistant. I chose Proxmox because it is open source and completely free. There are paid tiers of Proxmox that include enterprise-ready repositories and support, but the community version is completely free, there is a large community and many free online resources for assistance should you need it.
Minimum and Recommended Hardware

Proxmox itself only requires a small amount of RAM and hard drive space for itself. The official minimum specs for running Proxmox are:
- A 64-bit processor (Intel or AMD)
- Processor must support virtualization (Intel-VT or AMD-V)
- 1-2 GB RAM
- Around 32 GB of internal hard drive space (SSD recommended)
- A network card with a wired Ethernet connection
Surprisingly, many recent lower speed processors, including Intel Celerons are 64-bit and support virtualization. If you have an existing machine (or are looking at purchasing a low-end machine), you can check either Intel's or AMD's web site to see if the processor supports virtualization.
Now, you do need additional RAM and hard drive space for any virtual machines (VMs) that you create. But if your purpose is to primarily run Home Assistant, the specs only increase by the amount necessary to run Home Assistant (e.g. 4GB RAM, 32 GB hard drive). But the goal here is to add some additional "horsepower" and maybe have some left over for maybe an extra VM or two. So, my minimum recommendations are:
- 8 GB RAM (16 GB recommended if you want to run other VMs)
- 64 GB SSD (again, more for running other VMs, 120 GB should be fine)
So, as you can see, you don't need a high-end powerful server to run Home Assistant on Proxmox. In fact, you could probably run it on an old laptop (as long as the laptop has an Ethernet connection). Or you can buy a new lower-end mini PC or even a used/refurbished small form factor desktop computer to run your system. You don't even need an operating system (like Windows) on the machine. Just as long as it meets the minimum specs for running Proxmox + Home Assistant.
There are a few other components that you will need only for the installation process. They won't be needed once Proxmox is installed:
- A 2 GB or larger USB thumb drive
- Keyboard, monitor and mouse connected to the target machine for the installation process.
Preparing for the process

There are a few preliminary steps that you should take prior to starting the installation of Proxmox.
Update your current Home Assistant to the latest release
The Proxmox installation for Home Assistant is going to install the most current release of Home Assistant. To avoid potential issues related to the upgrading of Home Assistant itself, you should assure you are running the latest version and have resolved any issues related to that upgrade on your current system.
Create or download a backup copy of Home Assistant
If you upgraded Home Assistant in the above step, be sure to get a full backup after completing the upgrade. You can download the backup from Home Assistant, or from Google Drive (or other service) if you are using that for your backups. The backup file will need to be locally accessible from the machine you will be using to access Proxmox after the installation.
Backup anything you wish to keep from the target Proxmox machine
Installing Proxmox will delete any partitions and reformat the hard drive on the target machine. If this is a machine you were previously using, be sure to backup or copy any files you want to keep. If it is a new machine, and running an operating system like Windows, you may wish to boot the machine into Windows one time so that you can register the license with Microsoft. This will give you the option of repurposing that license at a later time if desired. Booting up the new machine once also assures there aren't any initial hardware issues.
With those steps complete, it's time to download and install Proxmox.
Downloading Proxmox and Preparing the USB Thumb Drive

Using any computer with an Internet connection and free USB port, insert a USB thumb drive that has at least 2 GB or more of capacity (assure you copy any existing files on the thumb drive you wish to keep as this process will reformat the thumb drive and any existing files will be lost).
If you do not already have an application installed that can flash an ISO file to create a bootable thumb drive, you will need to install one. I recommend belenaEtcher (download here). It is available for Windows, Mac and Linux and is straightforward to install. But if you need installation help, see the web site. If you have another flashing application, it is fine to use, but I will show Etcher here.
Once you have the flashing program installed, navigate to the Official Proxmox download site

Select the option for Proxmox Virtual Environment (often abbreviated as PVE)

Select ISO images.

Download the latest Proxmox ISO installer (ver. 7.3 as of the time of this article). Save the file to the local machine where you have installed the USB flash drive.
Next launch the flashing application (e.g. Etcher) and flash the ISO to the thumb drive. If you are using an different application, the screens may look different, but the process will be very similar:

- Select Flash from File: Browse to and select the .iso image you downloaded
- Select Target: Select the USB drive (make sure you select the right drive!)
- Click Flash
Checking the System BIOS

Before beginning to install Proxmox, there are a couple of things to check and possibly modify in the target machine's BIOS/System Settings. Accessing this will be dependent upon your particular machine by pressing a certain key when the computer first boots up. This is usually something like the F1, F7 or DEL key. Watch the screen to see if it displays which key to press, or if necessary, check the manufacturer's documentation. If the prior operating system (e.g. Windows) begins to boot up, you've missed it! Restart the machine and try again. You are looking for a window that looks similar to the above... but different BIOS will have different screens. There are two things to verify and or change here.
Assure Virtualization is enabled

Again, your BIOS and settings may be different, but you can normally find this setting under Advanced or CPU settings. Assure virtualization is enabled it or enable it if it isn't.
Set Boot Order to Boot from USB first

Next, find the boot order settings. Change this if necessary so that the machine first attempts to boot from the USB device before any internal hard drives. After Proxmox is installed, you can set the boot order back to using the hard drive first if desired.
With these two settings confirmed, insert the USB thumb drive with Proxmox into the target machine, save the settings and restart. If all is correct, the Proxmox installation screen will appear.
Installing Proxmox

Installing Proxmox is pretty much just point and click, but there are a few things to note. After selecting Install Proxmox VE on the initial welcome screen and agreeing to the license agreement, you will be asked to select the local hard drive where Proxmox will be installed.

If you only have one internal drive, only one option will be presented. However, if the machine has multiple drives, you can select where to install Proxmox. You should generally select the fastest drive here. If you have both an SSD and spinning hard drive, select the SSD drive. Unless you are planning on using replication between Proxmox servers, you can accept the default options and click the 'Next' button.
Note if you are planning on using replication between servers
This section only applies if you plan on having more than one Proxmox server and wish to implement replication of your VMs between those servers. Replication requires that the drive hosting VMs be formatted using zfs. To do so, use the Options button shown above.

The zfs format offers a number of different RAID options. If you have multiple drives you can select a RAID level that meets your needs. But for one drive (or if you do not wish to use RAID across multiple drives, just select RAID 0 and opt not to use a second hard drive.

There are some additional advanced options, like setting the boot partition size, but those are beyond the scope of this article. Check the Proxmox documentation if you wish to learn more.
Once the options have been set, choose Next on the main screen.

On this screen, simply select your country, time zone and desired keyboard layout. Note that time zone is critically important if you plan on using replication, as Proxmox relies on time sync between servers. So be sure to choose the correct time zone for your server location.

Email is used to send you notifications regarding operation of the server. You do not need to provide a valid email address, but you must enter a valid email format. For example, if you do not wish to provide a real email address, you can enter something like nobody@nowhere.com in this field, but you cannot leave the field blank. Click next.

Setup your networking information. If your machine has more than one network connection, select the one you wish to use. Then specify the desired full qualified hostname, along with the preferred IP address, gateway and DNS server for your network. Click next.

Finally, you will see a summary screen of your selections. Double check that everything is correct and click the Install button at the lower right. NOTE: Clicking the install button will begin the process of partitioning and formatting the selected hard drive. All existing data on the selected hard drive will be erased! Be sure this is what you want to do.
The Proxmox installation will start and a status bar at the bottom of the screen will show you the progress. Depending upon the speed of your machine, this process could take anywhere from around 3-10 minutes. Just let it run. When the install is complete, the server will automatically reboot. Be sure to remove the USB thumb drive once the reboot process begins. If you forget or miss this step, the original Proxmox installation Welcome screen will show again (since the machine once again booted from the thumb drive). Simply remove the USB thumb drive and restart the machine. This time, Proxmox should boot up on the machine. If all goes well and the boot process complete, you will see the Proxmox login:

At this point, you are done with the server. From this point forward, you will access Proxmox via a web browser from any machine on the same network using the IP address and port shown on this screen. You may disconnect any displays, the keyboard and mouse from the Proxmox server if desired.
In a browser from another machine, simply enter in the IP address of the server, along with the default port of :8006. Do note that Proxmox uses https: so the address entered in the browser should look similar to this:
https://192.168.1.17:8006
While Proxmox does use https:, by default it contains its own self-signed certificate. This may cause your browser to issue a warning.
 |
| This is Chrome's warning. Other browsers will be similar |
This is not because Proxmox is unsafe. It's just due to the fact that the internal certificate has not been registered with a certificate authority. You may safely continue and be assured that there is no danger in executing Proxmox. If you like, you may obtain a valid SSL certificate and install it in Proxmox, but that is certainly not required and process is beyond the scope of this article. Check online documentation for Proxmox if desired.
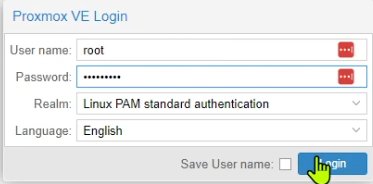
You will be prompted to login to the Proxmox server. The initial default user name is root and the password is the one you specified during installation. You can add other users, change passwords, etc. within Proxmox, but that will not be covered here.
Proxmox Subscription
Upon initial login, you are likely to see the following message:

This does not mean that your installation is invalid (or illegal), nor does it mean a subscription is required. Proxmox offers enterprise-ready and tested repositories for enterprise operations. By default, Proxmox is installed to use these repositories. However, there is also a free community version of Proxmox (with corresponding community repositories - these have just not gone through the rigorous testing required of enterprise operations).
Now, by all means you can purchase a subscription if desired. This will not only give you access to the enterprise repositories, but also helps to support Proxmox and its development. Without a subscription, you will see this 'No valid subscription' every time you log in and whenever you attempt to update Proxmox. While you always can update the underlying operation system files (Linux), you will not be able to update Proxmox itself from the enterprise repositories without a subscription.
But you can update the underlying OS files and Proxmox without a subscription by telling Proxmox to use the community repositories instead of the enterprise repositories. In fact, one of the first things we are going to do is run a script to change the repositories and then run a full update of Proxmox. For now, just click the OK button to dismiss the message and display the Proxmox interface.
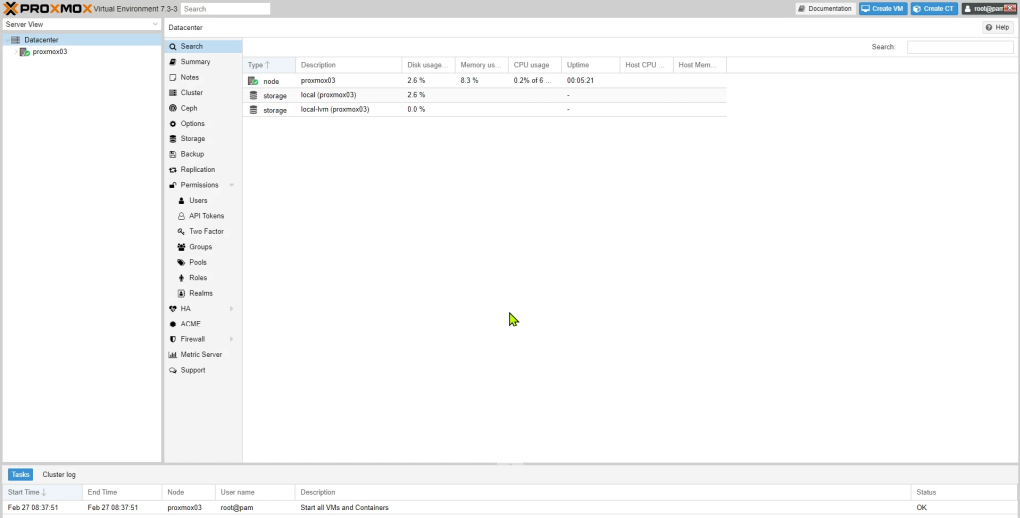 |
| Click to enlarge |
There is a lot to explore here, but again, this article is not meant to be a Proxmox tutorial. The YouTube video goes into a bit more detail, but the remainder of this article is going to focus just on the steps necessary to install Home Assistant, move your existing Home Assistant to Proxmox and create backups of the Home Assistant VM. Please refer to other documentation or online videos for more information regarding Proxmox. A few recommended sources are listed at the end of this article.
Updating Proxmox and Changing Repositories

IMPORTANT UPDATE: New versions of both Proxmox and Home Assistant required changes to the scripts shown under this and the following Home Assistant VM creation sections. Instead of using the scripts shown here, you can always find the latest script and instructions on the author's Proxmox VE Helper Scripts web site. Substitute the scripts shown there for the ones in this article.
Since this is a new install, it is always a good idea to run an update for any stability, security or feature updates that have been released. This includes both the underlying Linux operating system and the Proxmox application files. But as mentioned above, unless you purchase a subscription, you will not have access to the enterprise repository for Proxmox updates. So, in this section, we are going to update Proxmox to use the free community repository and then update Proxmox (including the underlying operating system) all in one simple step by just copying, pasting and executing a single script. No Linux knowledge required!
This script (and a number of other Proxmox helper scripts) have been developed by user tteckster and we are going to use one of these scripts to change the Proxmox repositories to the community source, disable the subscription "nag" message and also update all the files in one simple step.
Note: While it can always be risky to execute a "random" script from the Internet, this script has been widely used and promoted. I personally have used it dozens of time and consider it completely safe. If you are unsure, you can view the full content of the script on tteckster's Github repo.
Of course, it is possible to complete all these steps manually if you are comfortable with using the command line, navigating Linux directories and editing files in an editor. You can find online instructions for doing so. But for this article, we are going to use the script. The ultimate decision on if (or how to) perform these steps are up to you. If desired (but not recommended), you can simply skip any future updates and just dismiss the subscription nag message every time it pops up.
Running this script is very easy and doesn't require any Linux knowledge. First, just copy the following script to your clipboard (make sure to copy the entire script including the closing quote mark at the very end):
(see Proxmox VE Post Install for latest script)
Then in the Proxmox interface, complete the following steps:
 |
| Click to enlarge |
- Select the server (also called a "Node") from the left panel. At this point, you should only have one node listed under the Datacenter.
- Click on Shell to open up a command line interface.
- Right click with your mouse and select "Paste" to copy the above script.

It is recommended that you answer "y" to all prompts, but there may be one that you wish to skip. You will be asked if you wish to add the beta/test repositories. These are the latest, cutting edge versions of the files. It is up to you, but I tend to skip this option for my primary production boxes. The call is yours here.
The last prompt asks if you want to run an update of all files at this point. Select 'y' and the script will go out, pull all the latest updates (including Proxmox from the community repository at this point) and apply them. This will take a few minutes, so be patient. When the updates are finished, you are prompted to reboot the server. This is highly recommend. Select 'y' and wait for Proxmox to restart (you can refresh the web page or wait for the message 'Start all VMs and Containers' to appear in the log at the bottom of the page). Proxmox and all operating system files should be updated to the latest version at this point.
In the future, you can check for updates and apply them via the Proxmox web interface:

Simply select the node (server) you wish to check and click 'Updates'. Refresh the list for the absolute latest and if any updates are available, they will show in the list. Just click the 'Upgrade' button to apply them. A server reboot is always recommended after applying any updates.
Creating a Home Assistant VM
Now you are ready to create the Home Assistant virtual machine on Proxmox. This won't currently impact your running instance of Home Assistant, but as noted in the preparation steps above, you should assure your current Home Assistant is updated to the latest version and you have made a recent full backup.
Similar to the Proxmox update, we are going to copy, paste and execute a script for this step. This script comes from the same user (tteckster) as the update script. This particular script is going to install the full Home Assistant OS (likely the same thing you have on your Raspberry Pi). However, if you only want to install something like core for Home Assistant in a container, other scripts are available via ttecksters Github for installing in place of full Home Assistant.
Again, if you are uncomfortable running the script, you can manually create the VM and install Home Assistant by following the instructions and downloading the Home Assistant image file (use the KVM .qcow2 image and instructions).
Important: Please read this section carefully! Before running the script to create an instance of Home Assistant, there is one important item to consider. Do you need to keep the same IP address for Home Assistant? When this process is complete, your "production" or primary copy of Home Assistant will be running on Proxmox and the current version you are using will be shut down. Does this new version need to have the same IP? If you are using things like the MQTT broker add-on or other external devices that depend upon the IP address of Home Assistant, then you will likely want the new version to have the same IP address as the original. Otherwise, you will need to update all the individual devices with a new IP address.
This article is going to provide the steps to keep the IP address the same after moving Home Assistant to Proxmox. There are multiple ways to do this (and I'll mention some of those along the way), but the method I'm going to show is meant to minimize the downtime of Home Assistant. In fact, the total downtime of Home Assistant will be less than 5 minutes.
If you don't care if Home Assistant uses a new IP address, then you can simply shut down the old system after the new system is up and running (and skip all the MAC address stuff I'm going to cover). Once you've determined whether you need to keep the IP address or not, you can run the installation script.
To run the script, once again copy the following to your clipboard:
(See Home Assistant OS VM for the latest installation script)
And just like above, select the node (server), Shell and right-click and paste the above script:
 |
| Click to enlarge |
After pressing enter, the script is going to prompt you for certain selections, just like the update script. After you have confirmed that you want to create a Home Assistant VM, you'll be prompted about settings:

If you accept the default settings, the script will create a VM that uses 2 cores and 4GB of RAM.. along with assigning a random MAC address (that your router will use to assign a new IP address) and a default hostname of haos.9.3 (or whatever is the latest version). If your machine has more than 8 GB of RAM, more than 4 cores or you want a different hostname, you can opt to select Advanced option and make those changes. Many of these settings can also be changed after the VM is created via Proxmox (see below for an example). And in this case, I did want to change the amount of RAM, the VM ID number (defaults to 100 for the first VM on a server) and the hostname. Take a peek at the YouTube video if you want to see my walkthrough of the advanced options. But for now, we are going to keep the random MAC address, so that this new install will get a new IP address. You could copy the MAC address from the current system now, but it would require shutting down the current Home Assistant system before starting the new one (you can't have duplicate MAC or IP addresses on the same network). And if we have some sort of problem with the new install, it could make going back to the original system more difficult. It will also result in a much longer downtime for Home Assistant.
So for now, we will keep the random MAC address (and get a new IP for this install). We will change the MAC address when we are ready to cut-over to the new installation (covered below). This will also greatly reduce the downtime.
Finally, you will be asked if you want to automatically start the VM after the installation is complete.

Either option here is fine. If you want to review and possibly make some hardware changes before starting the VM, choose No. If you do choose not to start the VM right away, you can easily start it when ready by right-clicking on the VM in the Proxmox interface and selecting 'Start'.
Changing or updating hardware
If you select the default options during installation, or later decide you want to change some hardware settings, like the amount of RAM available to Home Assistant, you can easily do this via the Proxmox interface:

If, for example, you want to change the amount of memory (RAM) available to Home Assistant, you can just select the VM and then Hardware. Simply select the value you want to change and click Edit. Enter the new value and save. If the VM is currently running, you must restart it for most changes to take effect. If the VM is already stopped, the changes will take effect when the VM is started. In fact, this is the same process we will use to update the MAC address when ready to cutover from the current Home Assistant instance to this new one.
Restoring Home Assistant Backup

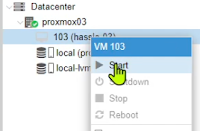
Next, we are going to restore a backup of your current Home Assistant configuration to this new instance. First, assure the VM is running and if not, start it by right-clicking on the Home Assistant VM in Proxmox and choose 'Start'. It will take a few second for the VM to start, but you will know it is running when the small green arrow appears on the VM:

Now, you need to know the IP address of this new Home Assistant instance. You can get that from your router, or you can very easily get it directly from within Proxmox. With the VM selected, just choose "Console":

The IP address will be shown right in this window! Note that since you now have two instances of Home Assistant running on your network, you should not use the homeassistant.local URL for now. We want to assure we are working with the proper instance, so for now, use the IP address. Enter this IP address in a new browser window, followed by the default port of :8123 (e.g. http://192.168.1.108:8123) and the initial Home Assistant setup screen should be shown:

Note: If this is the very first time you've started this VM, you may see a screen that says Home Assistant is being prepared (and may take up to 20 minutes). Just let this screen run, and after a few minutes, the login screen shown above will appear.
Now, if this was your very first Home Assistant installation (or if you simply want to completely start over with Home Assistant), you could just create a user name and password and start with a completely brand new Home Assistant. But in this case, we want to restore Home Assistant from a backup of the current system. You did create a backup as part of the preparation step right? Well if you didn't, the current system is still up and running! Just switch over to the current system by going to the original IP address and create a full backup now. You will need to download that backup to the current computer you are using when done.
Instead of creating a user account on the new system login screen, click the link at the bottom of the screen to restore from a previous backup. Browse to and select the full backup of the current system.

Confirm that you want to restore a full backup and click restore. You will be given a warning message that the current system will be overwritten... but there's nothing in this new system to overwrite yet.
Note: Be patient at this point. After you confirm that the restore of the backup, it will appear that nothing is happening. There is no indication provided on the screen. But in the background, the backup file is being uploaded, applied and Home Assistant is being restarted. This could take 5-10 minutes (or more depending on your system and network). Just wait. If more than 10 minutes have elapsed, try refreshing the browser page. If it says 'Page not found'... give it a few more minutes and try again. Eventually, the following will be displayed, indicated the restore and restart of Home Assistant is complete:

Check the IP address at the top and again confirm this is the IP address of the NEW installation.
Now, log in using the same user name and password as your current installation of Home Assistant. Your default dashboard will be displayed.

This should look nearly identical to your current instance because, well it's the same Home Assistant configuration running on Proxmox! Click around a bit and check it out. You may, however, find a few things that are showing errors or issues:

This is because these particular entities were reliant on the original IP address of Home Assistant (the MQTT broker in my case). But don't worry... that's what we are going to address next by moving the IP address from the current instance to this new instance as part of the final cut-over process. You may also have errors or missing devices if you use a USB dongle on your original system.
USB Devices and Dongles
There is one other thing that I'm not going to cover in detail here. If you are using an attached USB device like a Zigbee or Zwave dongle, you will need to move this device as part of the cutover process below, and add it to your Proxmox installation as part of this cutover. There is ample online documentation, but in a nutshell, you will use the Proxmox hardware setting for the VM and 'Add' hardware to add a USB device:

I'm not providing details here because... well, because I don't use any USB devices with my Home Assistant (my Zigbee hub is standalone) and I don't have a really good way to show an actual device setup. But the process is pretty straightforward and you can find lots of documentation online if needed.
Cutting over
Now everything is ready for moving to the new Home Assistant on Proxmox as your current system (and shutting down the old system in the process, so that you are left with one and only one version of Home Assistant... running on Proxmox).
Just to keep things straight for this section as to which Home Assistant version we are talking about (since there are now two of them), I'm going to refer to the original version as the "Pi version" and the new version we just installed as the "Proxmox version". If your current version is running on something other than a Raspberry Pi, just substitute that system for the old/current version.
At this point, both versions of Home Assistant should be running and on your network, but with different IP addresses.
To make the Proxmox version the current primary 'production' version and avoid any issues with devices that expect the current IP address, we need to port the IP address from the old (Pi version) system to the new one (Proxmox version). There are multiple ways to do this... the simplest being to just shut down both systems and change the IP reservation in your router from the Pi version to the Proxmox version then restarting the new Proxmox version. You can certainly do it this way. It will result in a bit longer downtime for Home Assistant and if you need to move back to the prior system for some reason (maybe something didn't go quite as expected), you will have to reverse this process and repeat it each time you want to switch systems.
The way I'm going to show involves cloning the MAC address from the Pi version to the Proxmox version. This has the advantages of less downtime for Home Assistant and you can easily swap back and forth between the new and old systems without dealing with a MAC or IP addresses. The only caveat here is that you must shut down one system before powering up the other. Otherwise, you end up with two devices that have the same MAC and IP address on the network... and that won't work!
First thing, you need to get the MAC address for the Pi version. If you do not already know the MAC address, you can either launch the command line for Home Assistant or get it from your router.

Here I'm using my router (yours will likely look different) to find the IP address for the Pi version. It shows me the MAC addressed used for that IP address. Copy this MAC address or record it somewhere. You will need it soon.
Now back on the Proxmox server, we need to temporarily shutdown the new Proxmox version.

Simply right-click on the Home Assistant VM and select 'Shutdown' from the pop up menu. This process will take a few moments, but you will know that the VM has stopped when the VM icon becomes greyed out and the green arrow vanishes.
Now, with the VM stopped, but still highlighted, select Hardware from the main window.

Highlight the Network Device in the hardware list and click the 'Edit' button.

In the MAC address field, paste or enter the exact same MAC address that you recorded from the Pi version. Click OK. Now, both versions have the same MAC address (and the router will assign the same IP), but only the Pi version is still active and running.
All we have to do now is stop the Pi version and restart the new Proxmox version. You can shutdown the Pi from within Home Assistant.

Starting with release 2023.3 (the current version at the time of this article), you will find a power button symbol at the top right hand corner of the Settings -> System menu that will display the above pop up. Selecting 'Shut down system' will power down the Pi (or whatever underlying system is running Home Assistant). As soon as this system powers down, you can start the new VM on Proxmox.
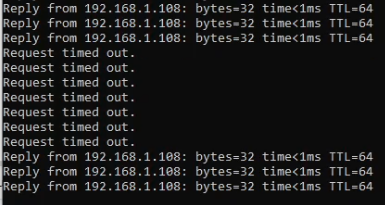
If you really want to minimize downtime as much as possible, start running a ping on the IP address of Home Assistant (or use Home Assistant itself... see below). In my case, the IP address is 192.168.1.108, so in Windows, I can open a command prompt window and issue a ping with the -t flag:
ping 192.168.1.108 -t
Once the ping is running, I can shut down the system and watch for the first time the ping times out.

As soon as you see this time out, you can start the VM on Proxmox. If you have any USB dongles as described above, this is now also the time to move those to the Proxmox server and use the Hardware -> Add feature to add the USB devices to the VM (see above). Once this is done, start the VM by right-clicking on the VM name and select Start:
If you still have the ping running, after just a minute or two, you should see the IP address start replying again:
Or as mentioned above, you can use Home Assistant itself. Open up Home Assistant is a browser if you aren't already using it to shutdown the system. Watch the lower left corner of Home Assistant. When it shuts down, you will see the following message:

Now after you start up the VM and once it connects and begins to start Home Assistant, you will see various messages as parts of Home Assistant starts, finishing up with this message:

What to do with the old version?
Just as an extra precaution, I'd keep the old system "on standby" for a day or two just in case you discover some sort of issue with the new system. On a Raspberry Pi, this means keeping the Pi shutdown, but don't make any changes to it yet. If necessary or something isn't working right on the new system, you can "rollback" to the Raspberry Pi. Just shutdown the VM on Proxmox and restart the Raspberry Pi (remember... when cloning the MAC address both devices cannot be on the network at the same time. Always shut down one device before starting the other). You must also move any USB devices if present.
Of course any changes you made on the new system will not be reflected on the old system.. unless you want to restore a Home Assistant backup from the new system onto the old one. This likely won't be needed though.
Once you are comfortable that the new Proxmox version of Home Assistant is working properly, you can repurpose the Raspberry Pi (or other prior system) for another project. But there is one additional note to be aware of:
If/when time does come that you want to repurpose the Pi (or other platform) for something else, remember that it will still have the same MAC address as before (if using the same network connection... WiFi will have a different MAC address from the Ethernet connection). This means you will have issues when attempting to connect the repurposed device to your network. At this point, you will need to either change the MAC address of the Proxmox instance (and update the router accordingly) or change the MAC address of the Raspberry Pi. There is documentation online on how to change the MAC address of the Pi (using a utility called macchanger is the most common), but this is beyond the scope of this article. Just Google it!
Adding a backup location (NAS)
There is one final thing you should do after getting Home Assistant running on Proxmox. Remember one of the big advantages of running in a VM is the ability to not only have a backup of the Home Assistant configuration, but to be able to back up the entire system.. so that if you have a server failure (or accidently mess something up), you can simply restore the entire machine.. Home Assistant included!
While you can create a VM backup right on the server itself (assuming you have the hard drive space), ideally you always want your backups stored on a different system in the event the entire server fails and you can no longer access the internal drive/data. To do that, I'm going to briefly show how to map a Synology NAS in Proxmox to use as a backup destination for my VMs. You can use the Synology for other things as well (e.g. ISO files, container templates, etc.) but the emphasis here will be on backups. Naturally, other NAS' or external sources will be different, but this should give you enough of an overview that you should be able to map your own external storage.. or easily find other online sources that will cover it. This isn't even the only way to do it on the Synology.
Setting up the Synology
This is the process I used on the Synology via the control panel. First, I created new user on the Synology called proxmox and assigned a password:

Next, I created a new share called Proxshared (you can call this whatever you want):

Finally, just give the new proxmox user read/write access to the Proxshared folder:
That's all that needs to be done on the Synology side. Now it's time to move over to Proxmox.
Adding a remote share to Proxmox
Again, the exact steps here will be dependent upon your environment, the type of remote storage, etc. This is just an example of mapping the Synology share created above, primarily for holding VM backups.
In Proxmox, select the Datacenter level on the left, then Storage followed by clicking the 'Add' dropdown:

This will drop down a list of possible formats for the mapped storage. Again, this will be dependent upon your environment and personal usage, but I select SMB/CIFS because it allows me to also easily map this share in Windows so I can (eventually) move files between Proxmox server backups. With this selection made, you will get the following dialog:

- ID: Give the storage a meaningful name for use in Proxmox
- Server: IP address of the Synology
- User name & PW: The same as you setup on the Synology above
- Share: Proxmox will actually log into the Synology using the above and show you all the defined shares. Just select the share you created for Proxmox
- Content: Here you specify the types of files you want to store on the share. You can select more than one (Proxmox will create a subfolder on the share for each type). For backups, select VZDump backup file. You can add other things like ISO files and container templates if desired.
Creating Backups and Backup Jobs
You can create a backup of your VM at any time by first selecting the VM:

Then select Backup and 'Backup Now'. Note that this also shows any previous backups and this is where you can also restore a backup by selecting it and clicking 'Restore'. When you select backup, you will be shown this dialog for the backup:

For storage, you can select local to create the backup directly on the server, or remotely to any mapped storage you've added (like the Synology).
Mode: Mode indicates the method that will be used to create the backup. The different modes provide different levels of consistency in exchange for various downtime for the VM.

Stop: This mode provides the highest consistency of the backup, at the cost of a short downtime in the VM operation.
Suspend: This mode is provided for compatibility reason... the use of snapshot is recommended instead of this mode.
Snapshot: This mode provides the lowest operation downtime, at the cost of a small inconsistency risk.
For me, if I'm doing a quick ad-hoc backup, I'll select snapshot. But for my scheduled backup jobs (covered below), I'll choose 'Stop' for the best consistency. And since I schedule my backup jobs for the middle of the night, I'm fine with a short amount of downtime for Home Assistant.
Protected: Checking this box will prevent the backup from being deleted per retention rules (covered under backup jobs below).
Compression: The selects the level of file compression applied to the backup.

Send Email: You can optionally have Proxmox email you on success or failure of the backup. Enter your email address. Note that if sending to an external domain, you will have to configure that on the Proxmox server. See online info as that won't be covered here.
Notes: Add any notes you wish to add to this backup. You can use the shown template values to substitute items like the cluster, guest, node, etc.
Once all the values are defined, the backup will begin as soon as you click the 'Backup' button. Note that depending on the mode of backup selected, the VM may stop and restart for a short amount of time. Once complete, the new backup will be shown in the list.
By default the backup file will contain the VM ID number and a date/time stamp. The notes, if any, are shown next to the available backup name in the Proxmox GUI and can also be viewed (or edited) by using the Edit Notes button above the backup listing.

Creating a backup job
Creating a backup job allows you to schedule backups to run automatically. They have a lot in common with the ad-hoc backups described above but also allow you to specify a schedule.

To create a backup job, first select the Datacenter level on the left (instead of the node/server), then backup and click the 'Add' button. As you can see in the above screen shot, I already have a backup job defined, and by selecting it, I can also remove, edit, view details or immediately run the job from this same screen.

General Tab
Node: This allows you nodes (or servers) to include in the backup job. In this case, the Proxmox data center only has one node (proxmox03), so that's the only selection here.
Storage, email, compression and mode options are the same as the ad-hoc method described above, so I won't cover those again. See above.
Schedule: This allows you to select the schedule you wish to set for the backup job.

The dropdown contains a few preconfigured options that you can select and modify, but this field is editable, so you can build your own custom schedule that meets your needs. For information on valid schedule fields and how to define a custom schedule, see this Proxmox document on creating Calendar events.
As an example, my custom schedule above will run the backup job every Monday, Wednesday and Friday at 3:30 am (local server time).
Selection Mode: This specifies which VMs you wish to include (or exclude) from the backup job.

If you select 'All', then all VMs in the selected node will be backed up as part of the job. This includes any new VMs created at a later time. Selecting 'All' is a convenient way to assure you don't forget to include new VMs in the backup job. When you select all, the lower portion of the page showing the VMs will be grayed out. If selecting Include or Exclude selected VMs, you then use the lower portion of the page to check those VMs you wish to include (or exclude) from the backup job.
Enabled: This checkbox does just what you expect... enables or disables the backup job.
Job Comment: Jobs aren't given names, so if you create multiple backup jobs, adding a comment might be handy to help describe the job. Comments, if any, are shown on the main form next to the backup job listing.
Retention Tab
On the retention tab, you specify how many backups you wish to retain. Note that selecting 'All' may eventually fill up your storage, so it is probably a good idea to set some sort of retention policy on your backups.
This form is pretty self-explanatory, but a Help button is available if you need more information. You can specify either the just a set number of backups, or can combine options, such as keep 5 daily, 2 weekly and 1 monthly backup. The retention will be somewhat dependent upon how often you run backups and the storage space you have available. In the above example, I'm just keeping the last 3 backups. That means when the 4th backup is created, the oldest one will automatically be purged.
Note Template
This is the same as the Notes field described above. Anything listed here will be applied to each backup created by the job.
Once you've defined all the fields, click OK and that's it! You now have a job created that will automatically back up your VM(s) on a regular schedule.
One final note on scheduling backup jobs. Just to prevent any potential issues, assure that you don't have a Home Assistant backup job (or other automation task) scheduled to run at the same time as the VM backup. If you have both type of backups scheduled for the same day, I'd schedule them at least 30-60 minutes apart so that something like the Home Assistant backup or other automation isn't interrupted by a VM shutdown/backup.
VM Snapshots
One final topic that is another advantage of running Home Assistant in a virtual machine and I find extremely useful. This is the ability to create a VM snapshot. Note that these snapshots are different than the snapshot mode of a full backup.
A VM snapshot captures the current state of the machine, right at that moment, including anything in memory. Think of it as a 'freeze frame' of the entire server at a given instant. Why can these be more convenient than a backup? For one, they take just a few seconds to create... and don't stop or interrupt the running VM.
They can be extremely handy before applying a Home Assistant upgrade, trying something risky in YAML or maybe just experimenting a little. Yes... you can take a Home Assistant backup, but that will take significantly longer (and require a Home Assistant restart)... and if you do something that crashes Home Assistant to the point that it won't boot up, you obviously will not be able to restore that backup. Restoring a snapshot is almost as quick as taking it!

To take a snapshot, select the VM, then Snapshots. If you have taken any previous snapshots, they will be shown in the list with the name you gave them, the date and time of the snapshot and any provided description. "Now" is shown, indicating the current state of the VM at that moment.
To take a new snapshot, just click the 'Take Snapshot' button.

Simply give your snapshot a name, select whether you wish to also include what's in memory/RAM at the moment and provide an optional description. Click 'Take Snapshot' and the process will run for just a few seconds and your snapshot will be complete!
Now, try that upgrade, mess with that hidden .storage file (well, you really shouldn't do that one), etc. If something gets messed up, just click the snapshot you saved and you were right back to where you were (again, in just a few seconds). Snapshots are a huge advantage if you like to experiment or always want to rush to update Home Assistant as soon as a new version is released. I have much more confidence in applying new Home Assistant releases now that I can quickly take a snapshot before applying them.
Wrap Up
There a ton more that could be discussed regarding Proxmox, it's advantages and other things you could do with VMs and containers. But the intent of this article was to show a quick and easy way to port your Home Assistant off of a Raspberry Pi and over to Proxmox. It is by no means the only way, and despite the length of this article, the whole process can be completed in less than an hour with only a few minutes of downtime for Home Assistant. You can find related links and more resources regarding Proxmox below.
My ultimate goal is to use three different servers running Proxmox and create a cluster for high availability of Home Assistant. This means if the server running Home Assistant fails, another server will spin up Home Assistant... all automatically! But that's a topic for a later video and blog article!
Links
And here is a what I think is a good tutorial video series on Proxmox:
Supporting this blog and related YouTube channel
If you'd like to support future content on this blog and the related YouTube channel, or just say thanks for something that helped you out, you can say thanks by buying me a one-off cup of coffee at:
No comments:
Post a Comment
To help eliminate spam and to keep all conversations civil, submitted comments are moderated. Therefore your post may not show up immediately. Please be patient as most reviews are completed within a few hours.