

I became frustrated with our overhead garage lighting due to a lack of a switch at the exterior service door to turn on the lights when entering from outside. In addition, the lights were occasionally left on overnight, burning at a whopping 845 watts! This was my adventure in solving these issues through automation.
Note: I have a related YouTube video that covers much of this same material in more detail if you'd prefer to watch a video. However, this blog does contain supplemental information around the Home Assistant automation and code used. Scroll down to Home Assistant Automations and Supplemental Information if you are coming here from the video for this additional information.
The Problems and Goals
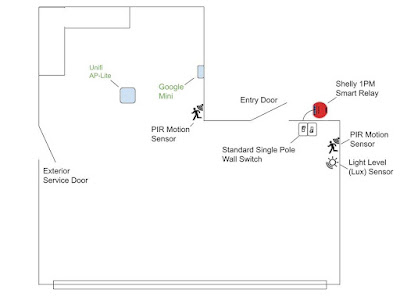
Here is a 'not-to-scale' simple diagram of my garage layout.

As mentioned above, the only switch to control the overhead lighting was at the entry door. There was no way to turn on the lights when entering via the exterior service door. And since the garage has no windows, you'd have to cross a very dark garage to reach the entry door or the light switch. And we use this door a lot, leaving the house to go for a run or walk, or even to do yard work.
The second problem is that the lights would sometimes be left on overnight. And with 13 recessed can lights using halogen bulbs and a two-bulb light fixture, 845 watts were consumed when the lights were on. Note: I've since replaced all the bulbs with LED equivalents which offer just as much, if not more, light while only using 140 watts.
So, while my major goal was to solve these two problems, if I was going to automate, I also wanted to attempt to achieve the following additional goals:
- There should be a simple override method, light manually flipping the existing switch, that would disable the automation and keep the lights on.
- When the automation was enabled, the lights should always remain on as long as motion was still detected.
- If there was adequate ambient light in the garage (such as when the overhead door was up during a sunny day), the lights should not automatically turn on.
- The final system needed to be reliable and fast. There should not be a delay upon opening a door or entering the garage and when the lights turned on.
First Attempt
Normally in most of my blog posts, I include a parts list near the beginning. But because I went through various iterations during this project, I'm going to include the final parts used a little later.
As one of my first DIY electronic projects, I built a multi-sensor for the garage by following a YouTube video from Bruh Automation called $15 DIY Multisensor
Now this was done before I had a 3D printer, so I just threw it in a project box, so it isn't that attractive. But more importantly, in addition to temperature, humidity and an RGB LED indicator, it had both motion detection and light level measurement. And it was already mounted in my garage right next to the entry door. So I thought all I needed to do was to make the existing light switch "smart".
Making the Light Switch "Smart"
I had a couple of different options here. I could replace the existing switch with a smart switch, which would also mean swapping out the face plate, or I could use a smart relay (to see the differences and advantages/disadvantages of smart plugs, smart switches and smart relays, see my YouTube video Smart Plugs. vs. Switches vs. Relays).
But since I knew I wanted something with local control, as a cloud-based solution was like to introduce delays which wouldn't work in my case, I opted to go with a Shelly 1PM smart relay.

The Shelly line of relays contain pin headers that make it extremely easy to flash new firmware without any disassembly or soldering. In addition, it is small enough and meant to be installed behind an existing switch, meaning I could keep both the current switch and faceplate. In fact, just by looking at it, you'd have no idea that the single pole light switch was even a smart switch! Extra wife approval points!
I'm not going to cover the wiring or flashing of custom firmware (I used Tasmota) in this blog as there is ample videos and other information out there on how to do this. I will leave a link to Tasmota below.
So, with the new smart switch and the muIti-sensor, I thought I had all the hardware to complete my automation. I was wrong! While it worked near perfectly when you exited the house via the entry door, the motion sensor was simply too far aware to detect movement at the service door.
Second Attempt
So, I figured I just needed to add a second motion detector closer to the exterior service door.
Initially, I wanted the second motion detector to be wireless... meaning battery operated... since I didn't have a convenient power source close by like I did with the multi-sensor. But this also likely meant a different communication protocol than WiFi... as WiFi is too battery hungry and if the device sleeps to conserve battery, it was too slow to respond to motion since the device needed to wake up and connect to WiFi before transmitting data.
Since I already had a Philips Hue hub for my basement lighting, I opted to purchase the Zigbee-based Hue motion detector ($40 at time of purchase). But after installing and configuring into the automation process, reliance on the cloud (Hue products require the use of their app/cloud) introduced an unacceptable delay. Often, after entering via the service door, it would take 2-5 seconds (often standing their waving my arms in the air) before the Hue sensor would report back and trigger the automation. Not acceptable.
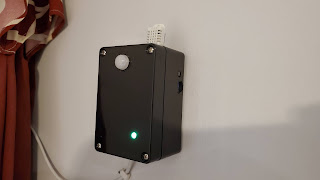
So, I knew that the motion detector that was part of the motion sensor was quick to react.. and also has a short cool-down time... my only option was to build my own motion detector based on the multi-sensor, even though this would require running an extended USB cable to an outlet with a phone charger to power it.

By this time, I had acquired my 3D printer, so I could make a nicer enclosure. And since I only needed motion (and not all the other sensors in the multi-sensor), I could make it much smaller by using a Wemos D1 Mini instead of a full sized NodeMCU. The cost for this DIY version was about $12 (compared to the $40 for the Hues sensor). If you want more details on the actual build of this motion sensor, and the ESPHome code uploaded to it, see the below section on Home Assistant Automations and Supplemental Information.
While this new sensor was a huge improvement over the Hues sensor in terms of response time, unfortunately the distance from the sensor to the exterior service door was right at the upper end of its range. It worked most of the time. But there were still occasions when the lights didn't immediately turn on and I'd have to take a step or two into the garage (again, waving my arms like an idiot) to get the automation to trigger. We lived with it this way for about six months until I became frustrated (as did my wife), before I decided I needed a different approach.
Third (and finally successful) Attempt
While I determined that the motion sensors could still be used to keep the lights on based on motion, I needed a more reliable way to initially turn on the lights when entering the garage from either door. The only viable option was to use door sensors (like on an alarm system) to detect when the door was opened and immediately turn on the lights.

Like the motion detector, if I wanted these to be wireless/battery operated, WiFi was not really an option. The two primary options available at the time were Zigbee and Z-Wave. But I also wanted local control for the speed and responsiveness. Fortunately, by this time Sonoff had released a Zigbee hub that could be flashed with custom Tasmota firmware.. and therefore, easily integrated into Home Assistant for my automation.

If you are interested in the steps to flash Tasmota to the Sonoff Zigbee bridge, Travis over at DigiblurDIY has an excellent YouTube video on the step-by-step process, all done with no soldering!
With these new additions (plus many other smart devices I added to the garage during the various attempts, the garage looks something like this:

Note that the devices shown in green are integrated into Home Assistant but are not used in my current lighting automation. However, it could be updated to do so. For example, instead of using light level, I could use the reed switches to determine if the overhead door is open and not automatically turn on the lights
With this new layout and implementation of the door sensors, I was able to use Home Assistant to meet all my original goals. And the system has been 100% reliable and fast since installation.
Parts List
This list contains the parts I used in the final attempt. While I list the the parts for the multi-sensor, see the Bruh Automation YouTube video for build and code instructions.
|
Part |
Notes/Description |
|
Multi-sensor Parts |
See link above for assembly info |
|
|
|
|
|
|
|
|
|
|
(Optional – not used in light
automation) |
|
|
|
|
|
|
|
|
|
|
|
|
|
|
Other Parts Used |
|
|
Used for existing light switch |
|
|
For second motion detector |
|
|
For second motion detector |
|
|
|
|
|
|
Note: The above links are affiliate links. While this does not affect your pricing, this blog may earn a small commission to use on future projects if you make a purchase.
Home Assistant Automations and Supplemental Information
I will leave a link below to my gist that contains the complete Home Assistant automation that I used. But if you've read any of my other blog articles or watched any of my YouTube videos regarding Home Assistant, you'll know by now that I'm a YAML guy and create all my automations via code. However, if you like to use the new user interface in Home Assistant to create your automations, I cover how to take my YAML and recreate the automations via the UI in my YouTube video.
Building the Motion Sensor
This is the information for building the second motion detector in my project, using a Wemos D1 Mini.
The wiring of the motion detectors is pretty simple and straightforward:

The VIN pin of the PIR sensor is connected to the 5V of the D1 Mini, GND to G and the OUT pin of the PIR is connected to D6 on the D1 Mini. You can also use the 3V3 pin on the D1 Mini to VIN of the PIR.... check the specifications of your particular sensor. The D1 Mini will be powered via the micro USB port.
On the subject of PIR sensors, many of the lower cost options may experience electrical interference due to a lack of shielding. This will lead to false triggers and could cause your garage lights to come on at random times. The PIR sensor I linked in the parts list above has worked well for me without random triggers.
This is the only code you need to add to the default ESPHome template created when adding a new node (other than updating your WiFi information):
binary_sensor:
- platform: gpio
pin: D6
name: "Garage Motion rear"
device_class: motion
You can give it whatever name you like (but you'll need to use this same name in your automation). And of course, if you use a different pin on the D1 Mini, update that as well.
If you've not used ESPHome before, there is an excellent article on their site for setting it up and flashing the firmware to your device: Getting Started with ESPHome
Additional Helpful Links:
My Complete Home Assistant Garage Lights Automation CodeSupporting this blog and related YouTube channel
If you'd like to support future content on this blog and the related YouTube channel, or just say thanks for something that helped you out, you can use any of my Amazon links to make a purchase at absolutely no cost to you. Or if you prefer to say thanks directly, you can buy me a one-off cup of coffee at:
No comments:
Post a Comment
To help eliminate spam and to keep all conversations civil, submitted comments are moderated. Therefore your post may not show up immediately. Please be patient as most reviews are completed within a few hours.